I did a video interview for IamPulse, a small and growing company out of Okta that is focused on simplifying and teaching cloud security. I talk about my history with computers as well as my predictions for the industry.
#IAM #CloudSecurity #IamPulse
Please click the picture or here to see the article and video. kyler
This blog series focuses on presenting complex DevOps projects as simple and approachable via plain language and lots of pictures. You can do it!
Hey all!
I have written lots of blogs (43 and counting!) under the heading “Let’s Do DevOps,” or simple, picture and code-heavy descriptions of how to succeed at many different modern DevOps tasks and architectures.
In this video I give a talk to an internal company audience about how we have replaced our internal-facing CI/CD static ec2 builders with container-driven pools that are replaced after every job.
These containers are rebuild from source nightly, and stored in one container registry location in one account, and a single secret in the Secrets Manager service in a single account stores the registration secret used by builders to register and start receiving jobs when they come up.
There are tons of security and operational benefits with this model, and I hope you enjoy this discussion and overview of them.
I was able to participate in a podcast discussion for NetworkCollective with Nick Russo and Craig Stansbury to discuss the new Cisco DevNet certifications and what it means for Cisco and the broader IT industry. Please listen in!
Here's my #HashiTalks2020 presentation about my company's transition from single-cloud, single-devops to cloud agnostic Terraform and multicloud Azure DevOps, pipeline and infra-as-code environments.
tl;dr: Here’s YML code that will build an Azure DevOps pipeline that can be run automatically as part of pull request validation (pre-merge) and requires manual approval by definably admin groups in order to proceed to touch resources.
Microsoft’s Azure DevOps (ADO) is an incredibly powerful CI/CD platform that is being rapidly developed by $MSFT. However, as with any rapidly-evolving product, the documentation sometimes leaves something to be desired. I solved a few problems with the help of the Azure DevOps development team and I thought I’d share my solutions. Hope they help.
Pairing Terraform with a CI/CD like Azure DevOps, Terraform Cloud, or GitHub Actions can be incredibly empowering. Your team can work on code simultaneously, check it into a central repo, and once code is approved it can be pushed out by your CI/CD and turned into resources in the cloud.
Cisco, the king of data center networking for 3 decades, is becoming increasingly less important in a cloud-first world. Cloud native networking at AWS, Azure, and Google Cloud (GCP) aren’t great — there’s tons of opportunity, but Cisco has yet to fully commit to bringing their products to a cloud-first world, despite their new moniker as a “cloud-first” company.
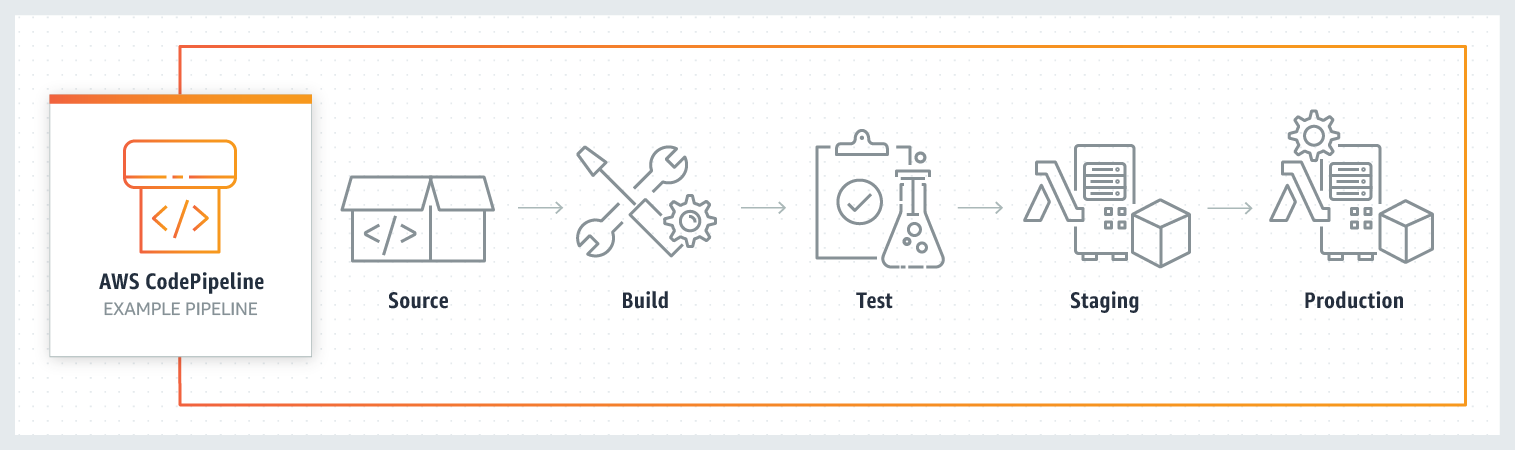
AWS CodeCommit is one more CI/CD to enter the increasingly crowded competition for CI/CD products. AWS has provided an entire suite of products:
CodeCommit: A managed git repo. We’ll check our terraform code into a repo hosted in Codecommit. Enough said.
CodeBuild: A managed continuous integration service. It runs job definitions, dynamically spins up and down build servers, and can support your own tooling, i.e. terraform! We’ll write a deploy terraform build in CodeBuild.
CodeDeploy: A managed deployment service that helps push code from a repo to AWS services where it can be executed. This is the only CodeX service from AWS we won’t use.
CodePipeline: A managed deployment service that supports complex deployment processes including code testing, automated deployment all the way to production. We’ll write a pipeline to automate a PR merge → terraform deploy.
Every data center I’ve ever worked at has had some sort of egress internet filtering for security. This makes perfect sense in a world where partners have static IPs, or even when partners can provide the range of IPs they have registered with IANA. But in the cloud world? Not so much.
GitHub, the ever-present cloud code storage tool, entered the CI/CD market in mid-2019. Their killer feature is that your code is probably already stored in GitHub, so why not have them manage automatic actions natively, rather than relying on other more complex methods like webhooks, or web scraping?
Photo from Skeeze@PixabayPairing Terraform with a CI/CD like Azure DevOps, Terraform Cloud, or GitHub Actions can be incredibly empowering. Your team can work on code simultaneously, check it into a central repo, and once code is approved it can be pushed out by your CI/CD and turned into resources in the cloud.
This blog series focuses on presenting complex DevOps projects as simple and approachable via plain language and lots of pictures. You can do it!
There are many platforms springing up that want to run your CI/CD to store your Infrastructure as Code codebase and execute it to build and manage resources. These products vary to a great degree in what they can do and what they cost. Most of them are available from the cloud providers who provide the service for almost no cost as a gateway to you buying CPU cycles at their cloud.
Because their vested interest in you utilizing their CI/CD is tenuous as best, there are two major drawbacks to these cloud-specific CI/CDs:
They focus on the local cloud — For instance, Microsoft’s Azure DevOps has great, native integration with the Azure cloud, but you better know what you’re doing to get the AWS side of the house to work, and work reliably (and a CI/CD must work reliably)
Features are deployed as a “box-checking” measure — Sure, Azure DevOps can technically support cross-project plans and graphical designs, but the feature deployments are minimal and prone to breaking and limitation. Sure, the CI/CD technically support these features, but in practice, they don’t work well
This is probably because building the first 50% or so of a CI/CD is pretty easy. Git is a mature and open-source code replication and merge logic protocol, and executing executions against the master branch using common configuration deployment tools, like Terraform is easy. But what about cross-repository code access and versioning, RBAC and AD-integrated permissions management, and pull request validation and approval check-pointing.
Clearly, this is a problem where the second 50% of the problem can be very difficult to solve. That takes a concerted effort that the cloud providers simply aren’t incentivized to solve very quickly. However, there are other potential entries into this space that are much more incentivized to get into this potentially lucrative market, including Github (GitHub Actions), Azure DevOps and Pipelines (which I’vewrittenaboutextensively), and what I’ll be focused on today — HashiCorp’s Terraform Enterprise.
Yep, the company behind Terraform is getting into the SaaS continuous deployment game. They don’t yet offer a code storage platform (though it’s got to be coming soon), but their integration into most other popular SaaS git repositories means it hardly matters.
In this blog, I’ll walk through deploying terraform code into a GitHub repo, integrating that repo with Terraform (TF) Enterprise, building a workspace in TF Enterprise to execute the terraform code and store the TF state, and push the changes out to an AWS account.
Lots of cool stuff to get to. Let’s get started.
Find the Terraform Cloud, Build your Org
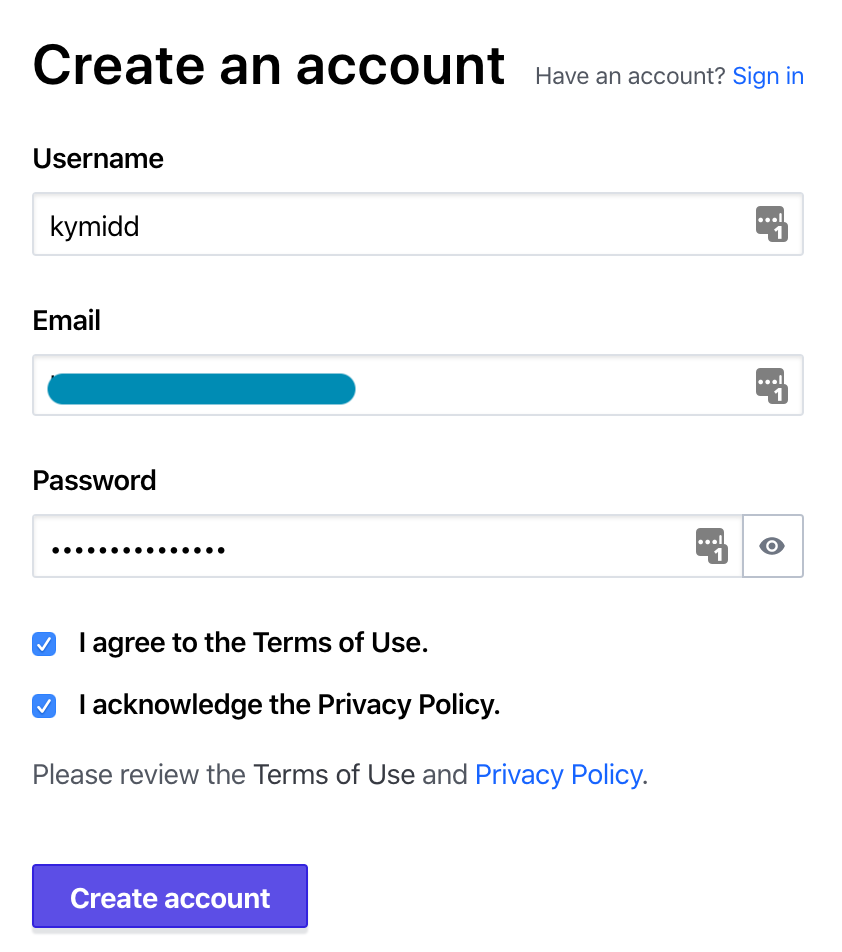
Let’s find the Terraform Cloud web page here and create an account.
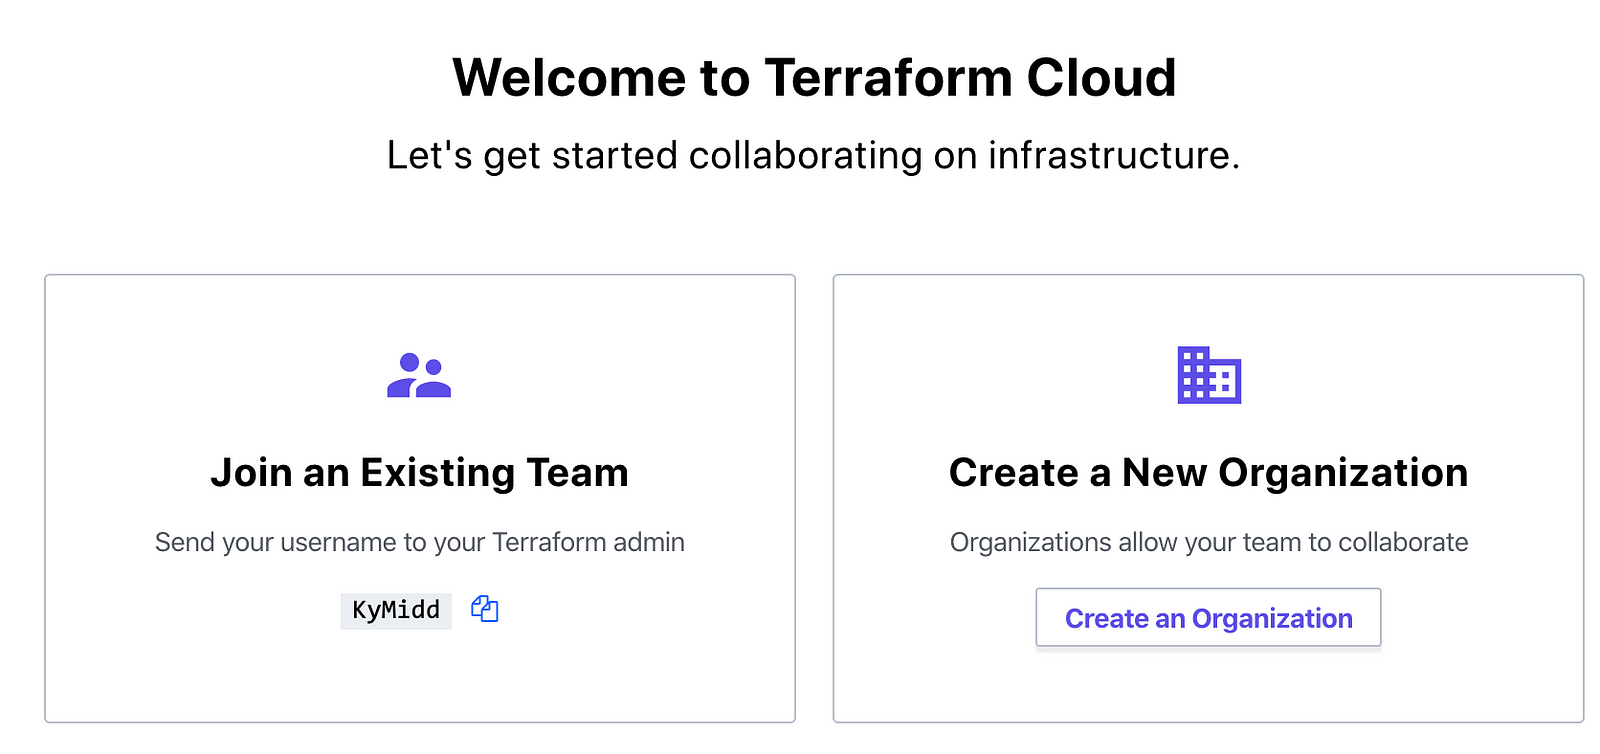
Now that you’re in, you have a choice — you can join an existing team, if someone at your biz has already built something on this platform for you to use. If you’re the first one, good for you. Let’s assume you’re pushing into something cool and new, and build our own organization.
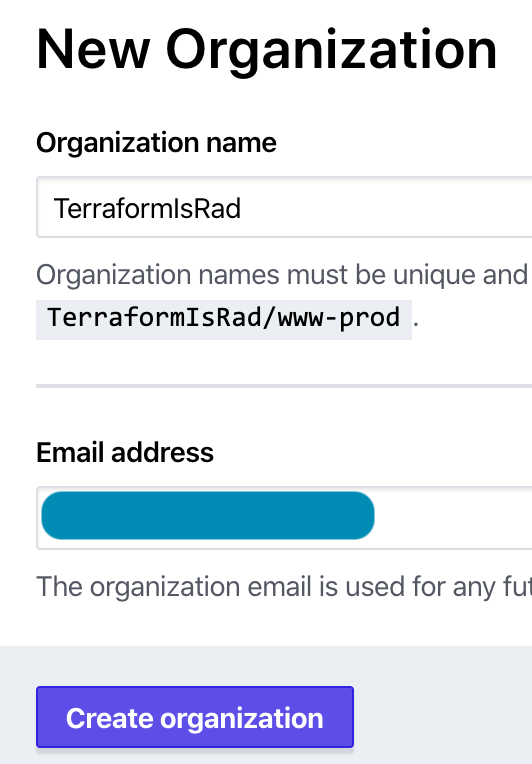
Create any name you’d like for your organization. It can only be changed later by deleting your entire organization and all settings and creating a new org, so make sure you’re happy with it before proceeding.
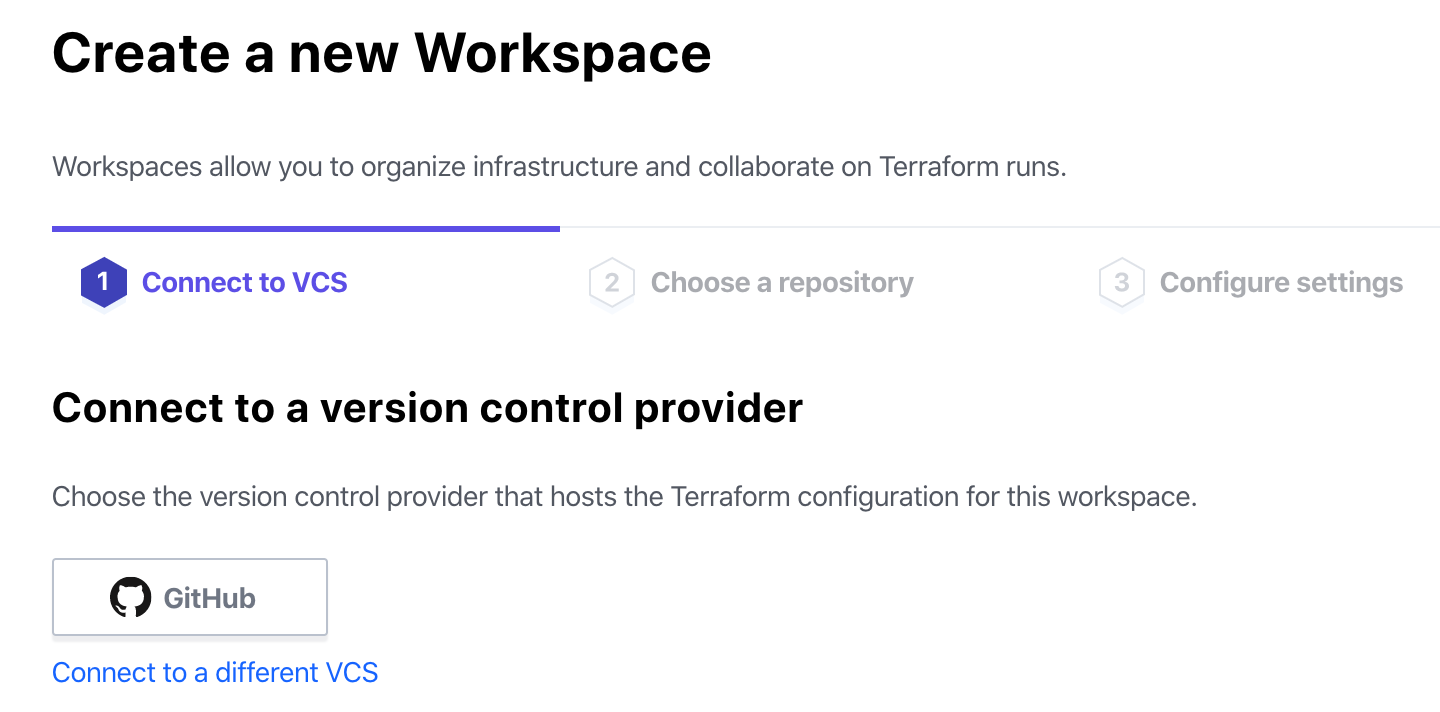
The first step Terraform Cloud walks you through is to create a workspace, which involves linking to a VCS (Version Control System) like GitHub. But we’ve skipped the step where we build that, haven’t we? Let’s go create a GitHub repo where we can store our code.
VCS — Let’s Create a GitHub Repo
If you’ve never had a GitHub account, go get one! #CodeIsLife. When you’re done, come back here and we’ll create a repo.
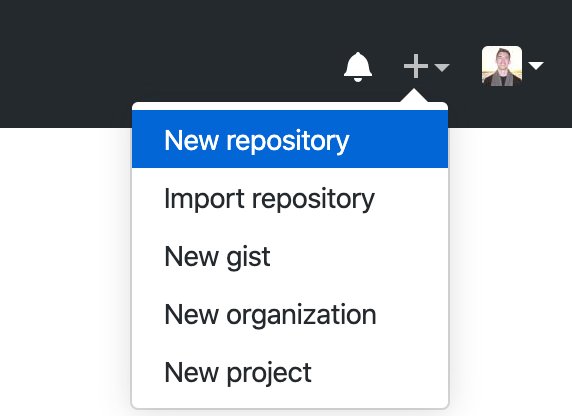
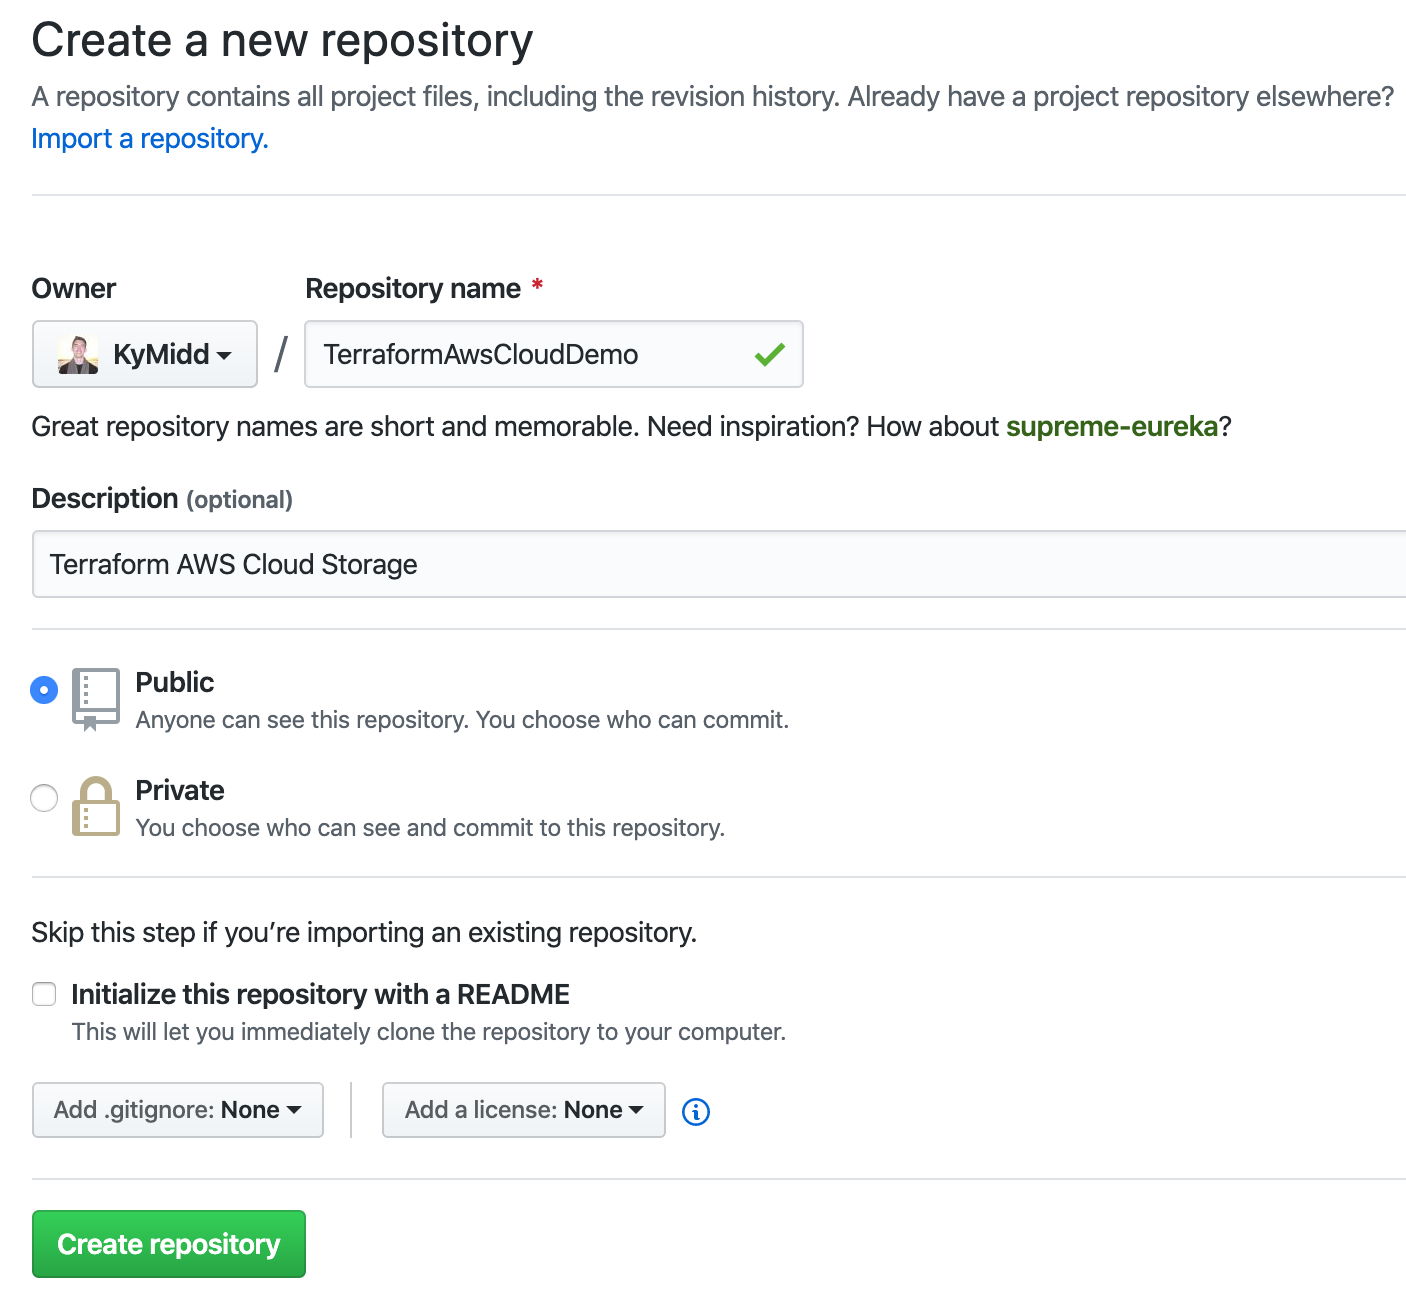
After logging in, click in the top right on the plus sign, then on “New repository”.
Name the repository — it has to be unique within your account. You can add an optional description, and set whether the repo is public or private. I’ll start with public for now since it’s simplest. Since actions will be made automatic based on code uploaded to this repository, it’s a good idea to look into Private repositories and how to use them. Don’t choose either of the “initialize the repo” options at the bottom.
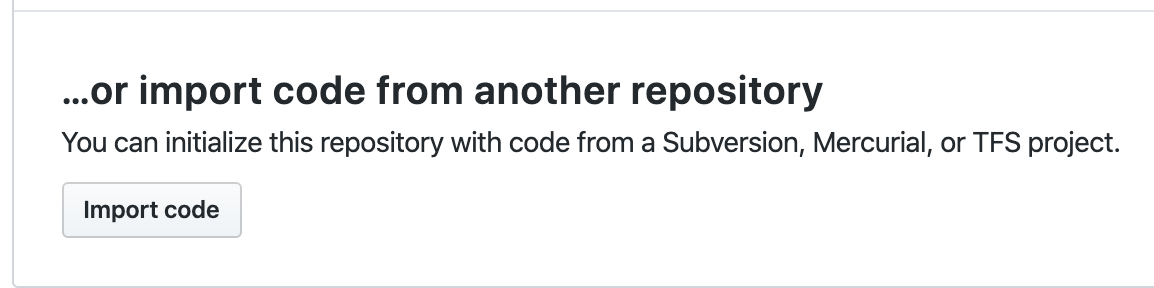
The repo is now empty and needs to be initialized somehow. GitHub has a handy feature that can replicate code server-side from another project. We can use my public-facing project with some basic AWS terraform config and a basic .gitignore file. Let’s choose “import code” option at the bottom.
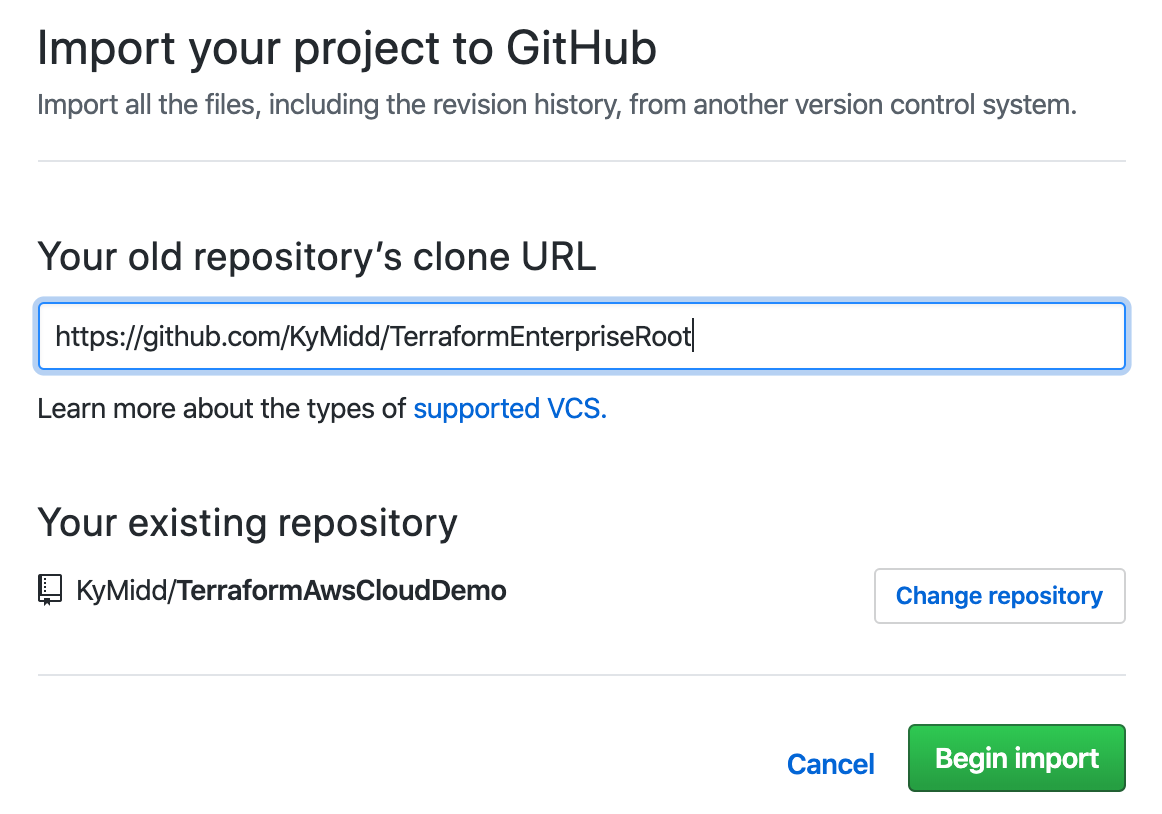
Enter the public repo for our base AWS code (or upload your own valid TF AWS config) by entering this URL as the old repository’s clone URL: https://github.com/KyMidd/TerraformEnterpriseRoot. Then hit “Begin import”.
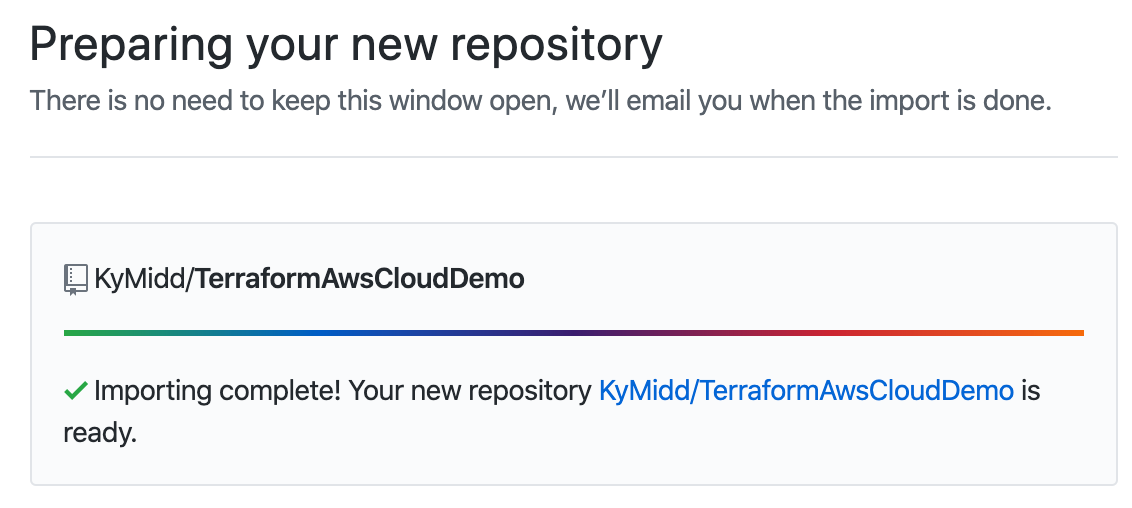
After about 2 minutes, you’ll get an email that the import is done. You can refresh your page to check the status also. You can click on the link to see your repo filled in. Take note of your repo’s URL — we’ll need to link Terraform Cloud to it in a minute.
Back to Terraform Cloud — Link GitHub
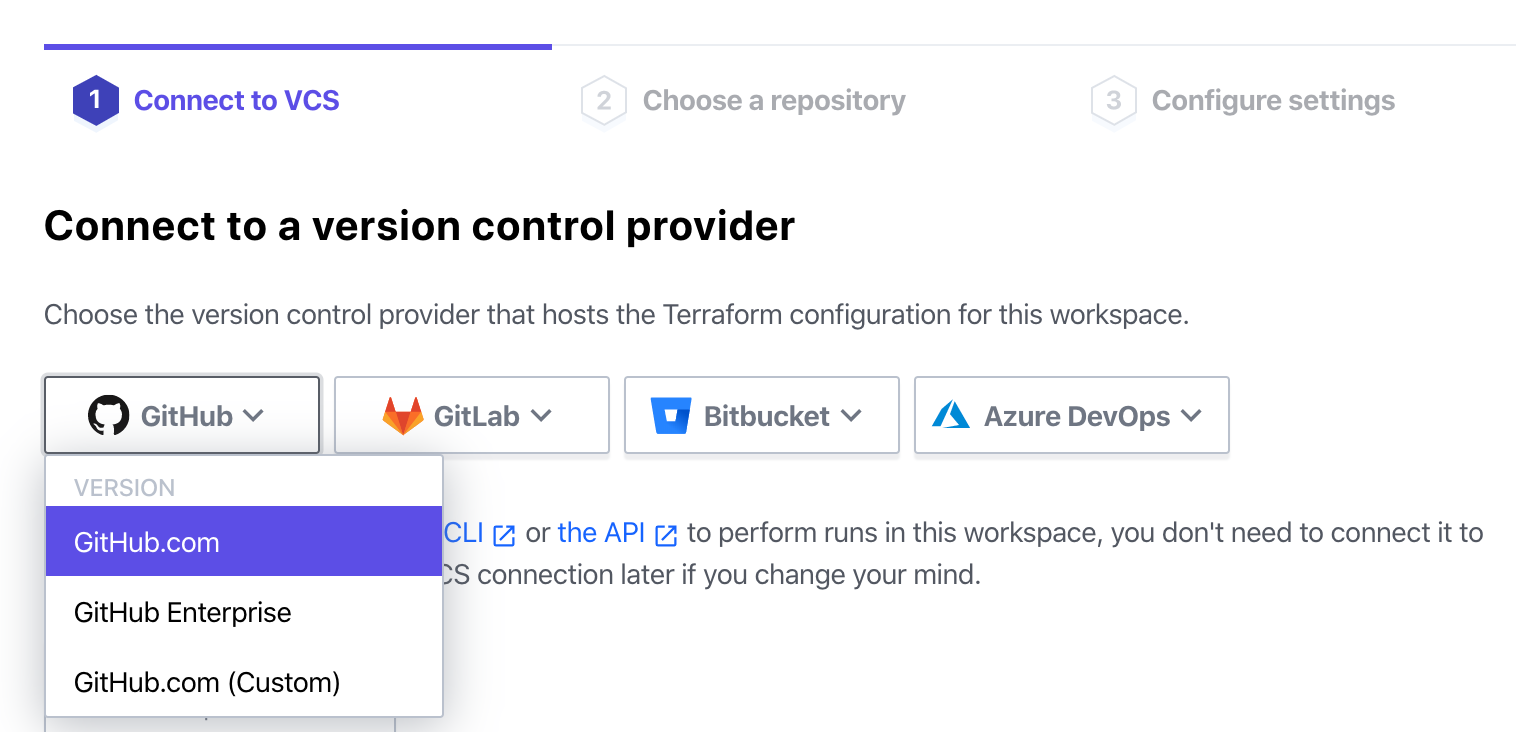
Back at the Terraform Cloud page, we’re creating a new workspace, and still on step 1. Now that GitHub is ready, select that option to move forward.
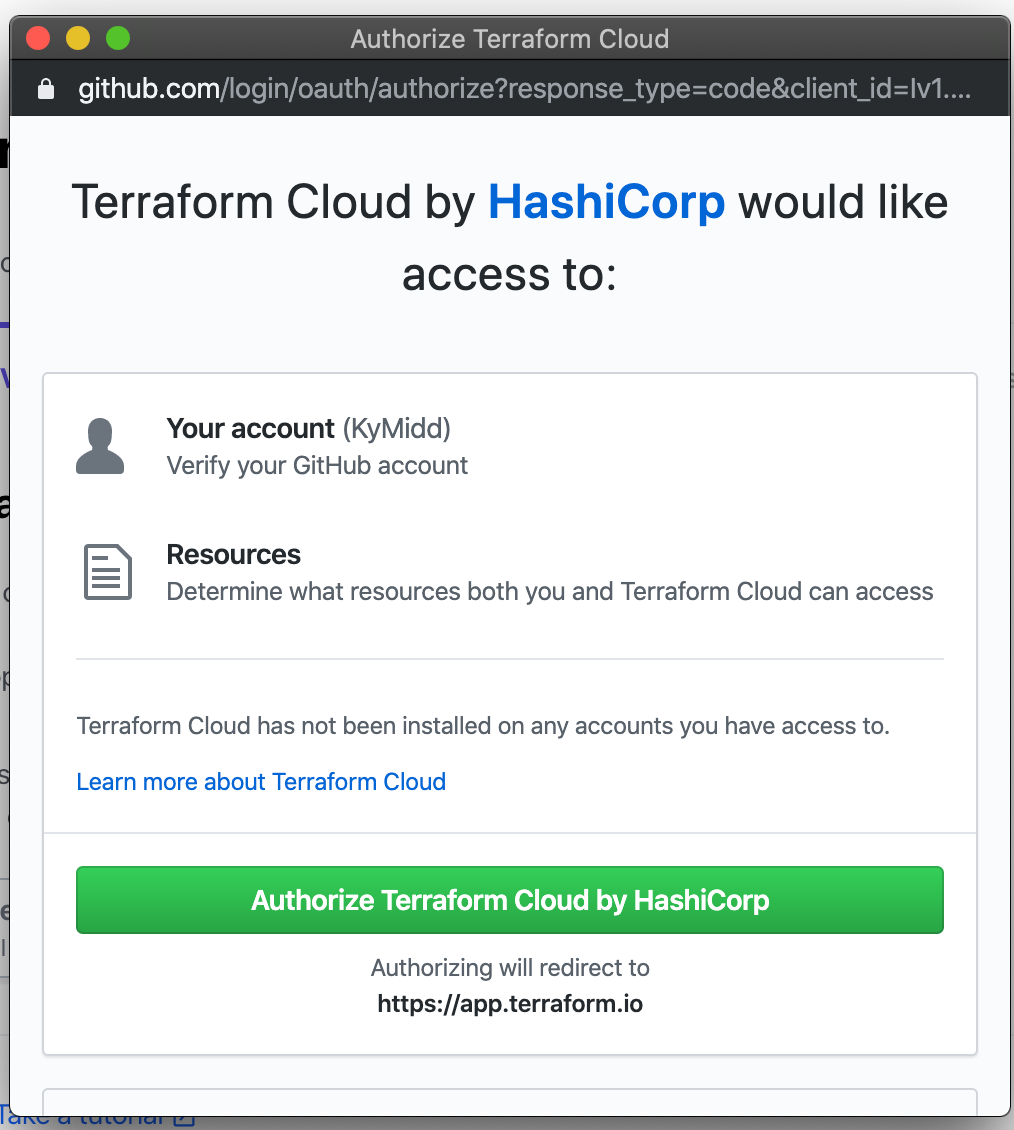
Terraform Cloud will launch a smaller authorization window, where you’ll be prompted to authorize Terraform Cloud to access the code in your GitHub account. The permissions here are broad, but don’t worry — you can limit them in the next step. Click “Authorize Terraform Cloud by HashiCorp”.
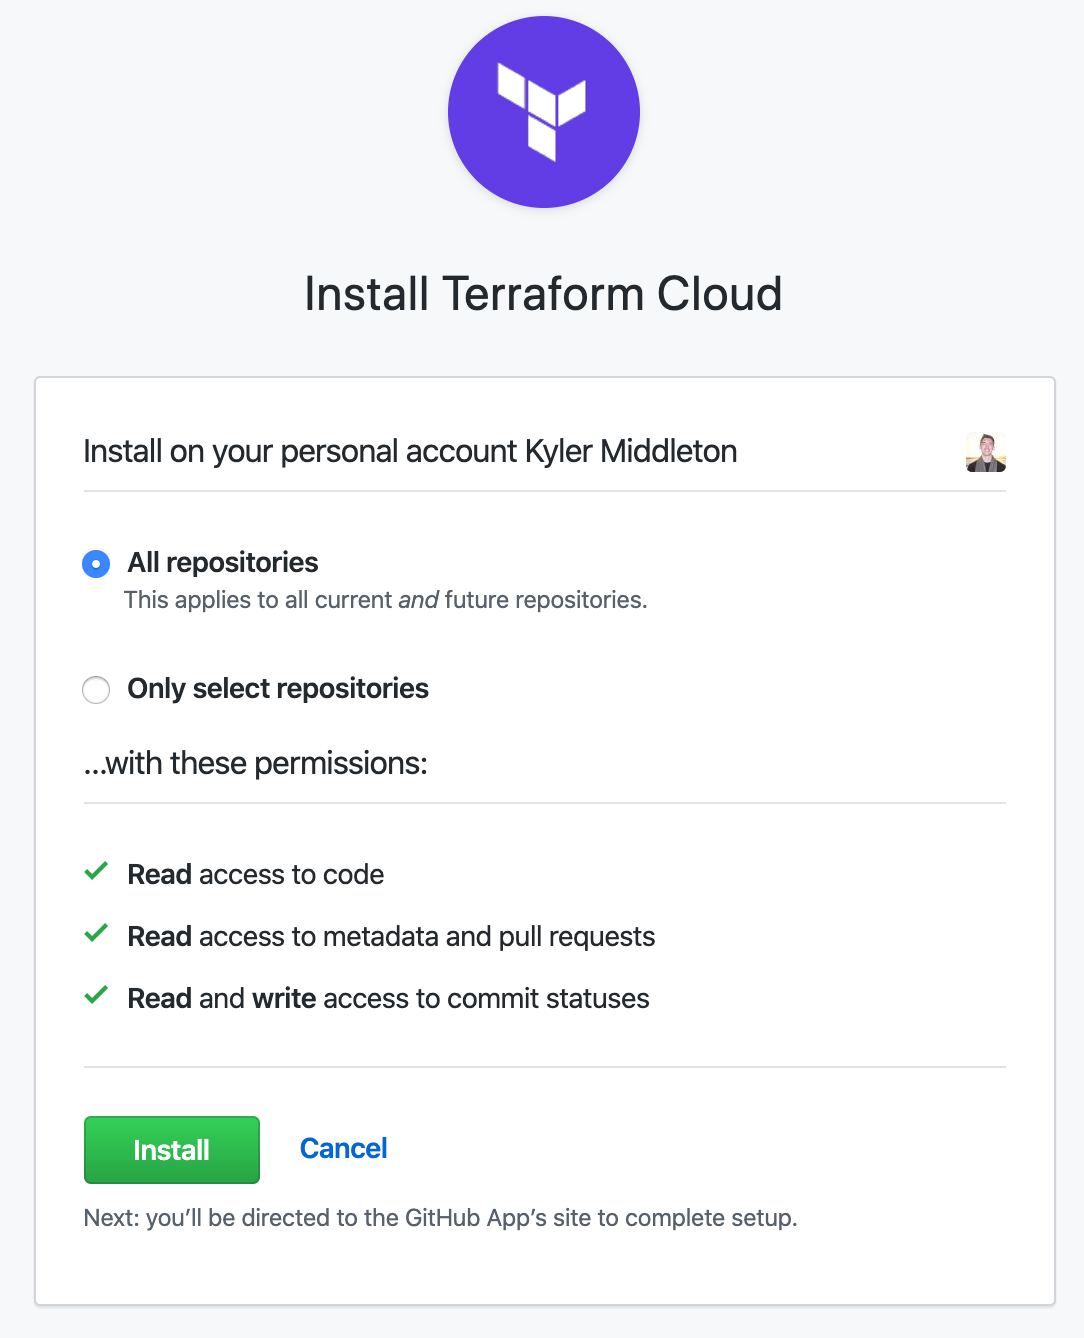
Next, GitHub will install a webhook to Terraform Cloud that is linked either to all repositories you have or only to specific ones you select. I’ll choose “All repositories” for simplicity in this demo, but feel free to limit it down to just the new repo you created with AWS terraform code.
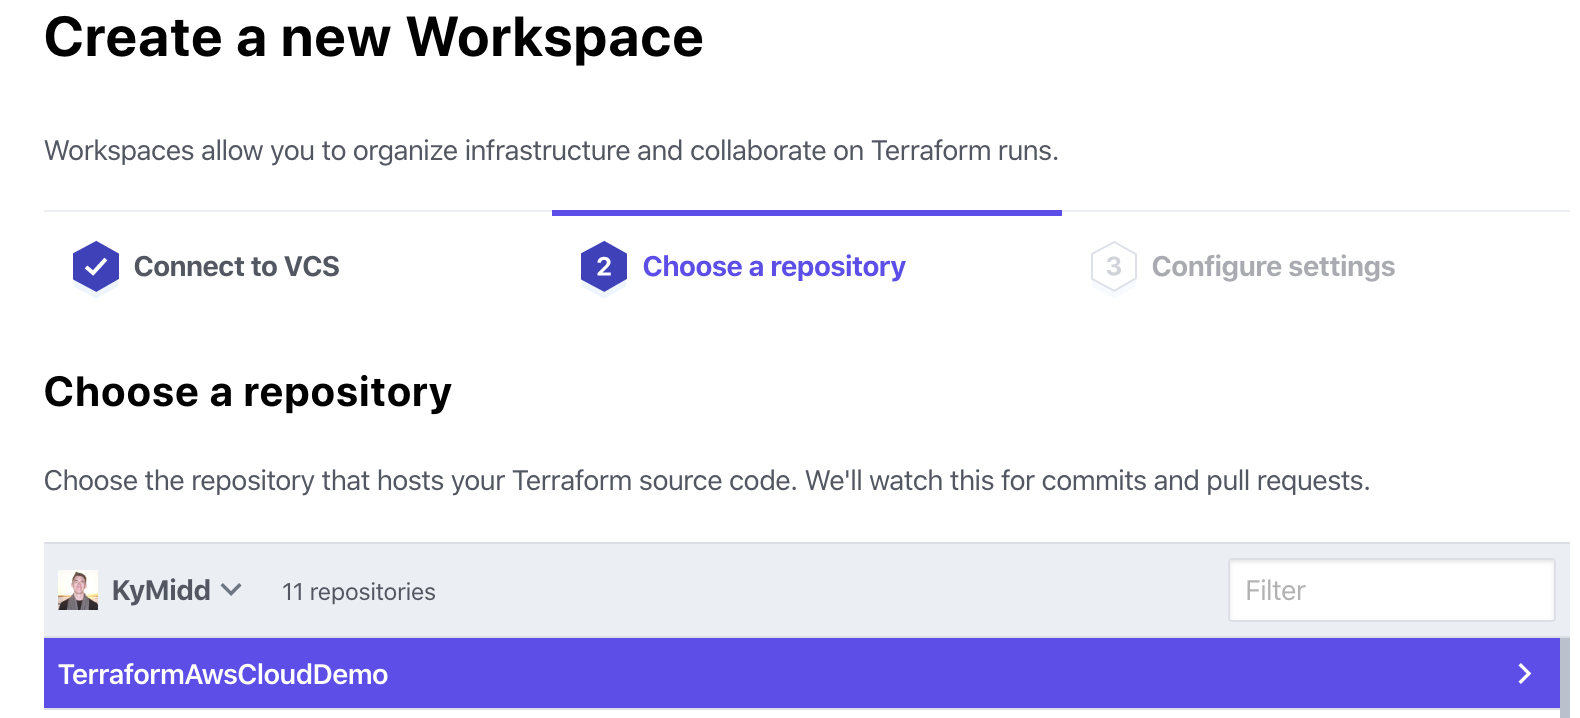
Finally, step 1 is complete. Step 2 wants us to tell Terraform Cloud which repos to link to. It will show a list of your repositories. If you have a lot of them, there is a search bar under the selection area. Click the repo, and we continue on to step 3.
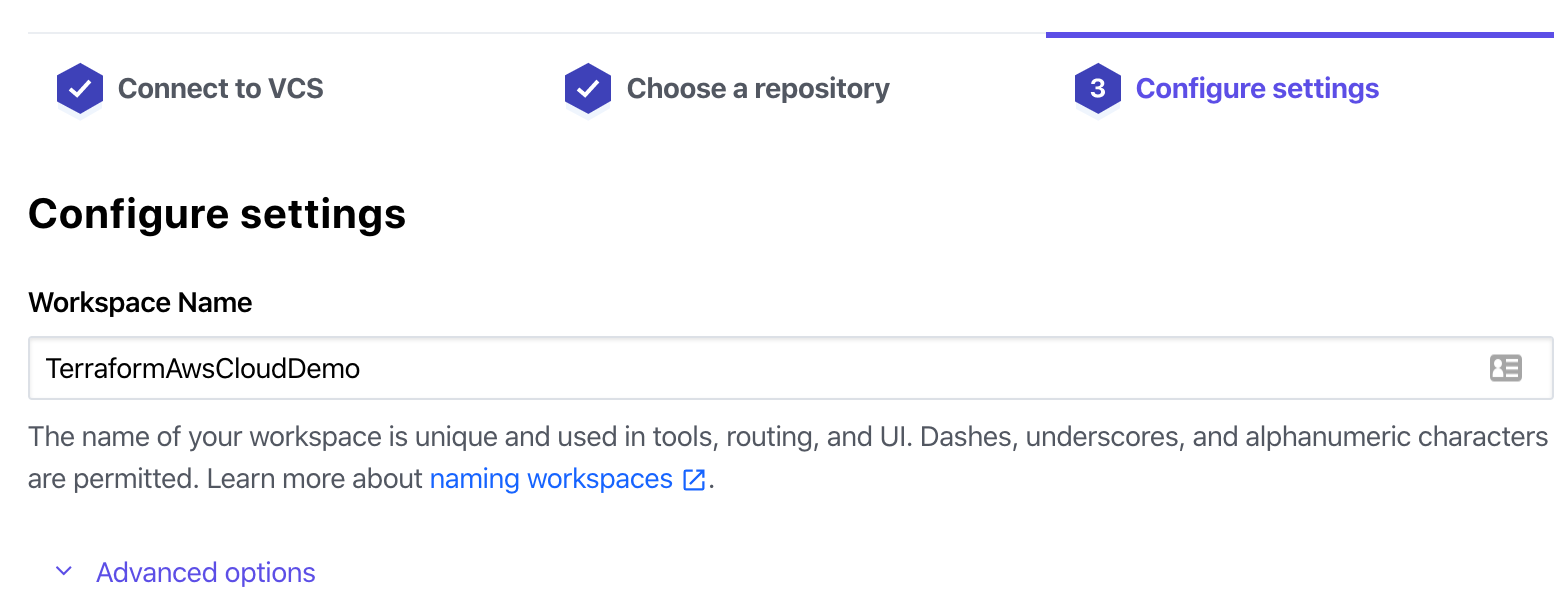
You can name the workspace, which is local just to within Terraform Cloud. It defaults to the same as the repository name, which I find helpful to keep everything aligned.
The advanced options permit watching a branch other than the default/master branch or triggering runs for specific files, rather than the default of any file. We’ll leave all the options at their defaults for the sake of this demo. Click “Create Workspace”.
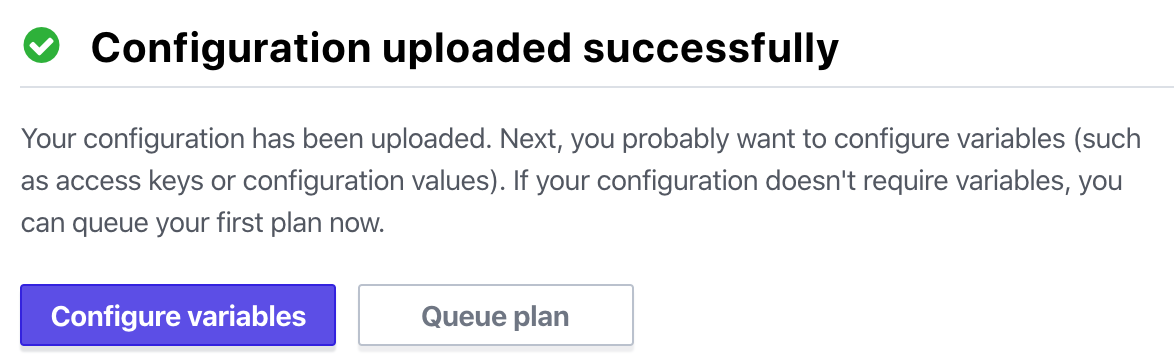
The workspace will use the snazzy new GitHub permissions to reach out to the repo and synchronize the files. You should see the following success message after a minute or two. If you see any other message, read back on the blog here and make sure all permissions are assigned correctly.
Click on Configure variables.
We need to build an IAM user in AWS to permit Terraform Cloud to reach into AWS and make changes. Let’s leave the Terraform Cloud page here on the variables page — we’ll be back in a minute.
AWS: Let’s Build an IAM User
Terraform uses variables for all sorts of things. There are the “Terraform variables” which are used within terraform, and used for setting names, controlling resources, etc.
There are also the “environmental” variables that are used for more external items like authenticating to a cloud provider, e.g. AWS.
There are lots of ways to link Terraform to AWS — HasiCorp maintains a page that shows the different methods. One of the most secure ways is to run your code from a local box within the AWS account, something I’ve discussed in a previous blog post. This method prevents static credential use, particularly for the high permissions Terraform needs to build and manage most/all resources.
However, Terraform Cloud doesn’t (yet) support external compute resources to execute Terraform code at the behest of TF Cloud, so we need an alternate method. We’ll use the easiest — building a static IAM user with administrative permissions in AWS, but note that there are others which are better security best practices.
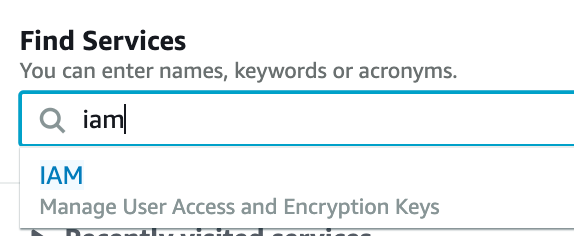
First, jump into AWS and type IAM into the main page console, then click on the IAM dropdown.
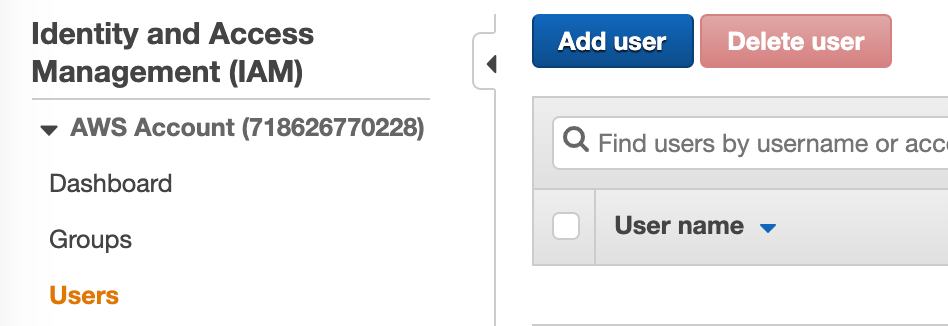
Click on “Users” in the left column, then click on “Add user” in the top left.
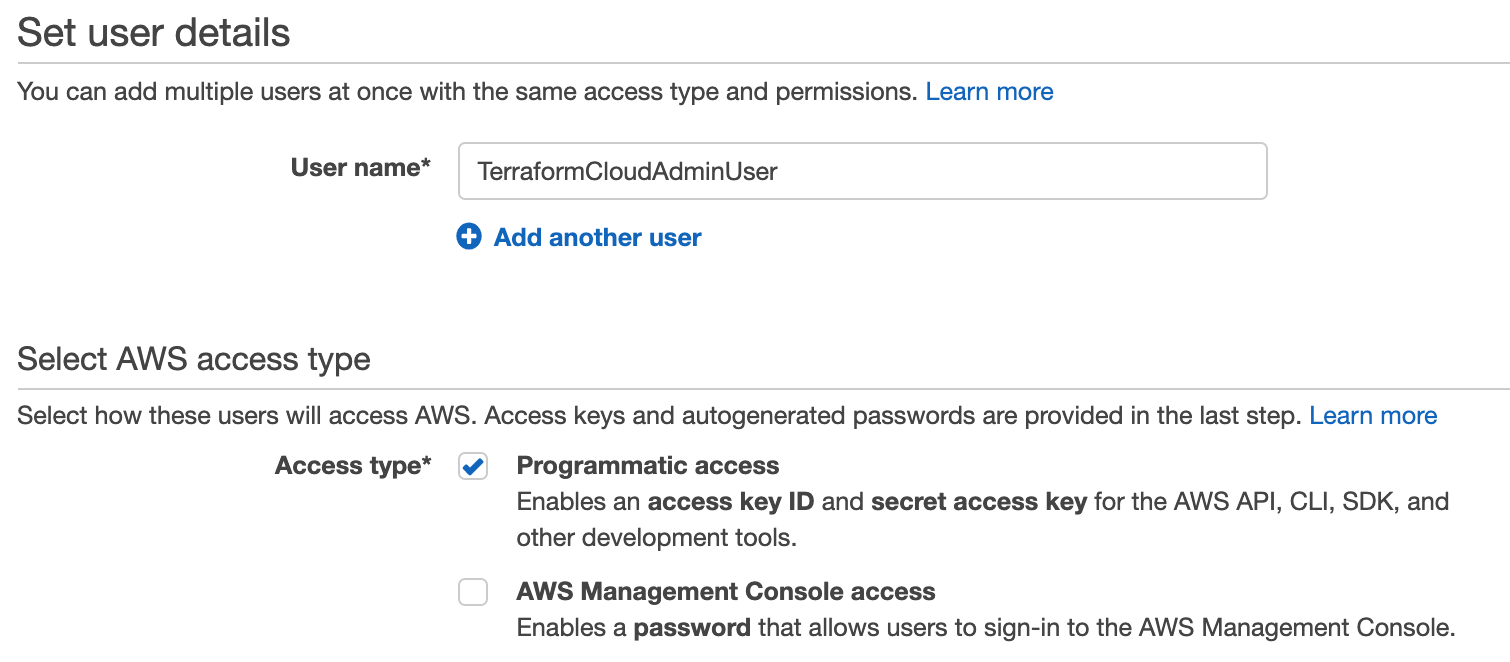
Name your user. It can be anything, but it’s helpful to have it named something you recognize as a service account used for this Terraform Cloud Service. Terraform can only do what the IAM user can do, and we’re going to make it a global administrator within this account, so I like to include “Admin” in the same so I remember not to share the access creds.
Also, check the “Programmatic access” checkbox to build an Access Key and Secret Access Key that we’ll use to link TF to AWS, then hit “Next: Permissions” in the far bottom right.
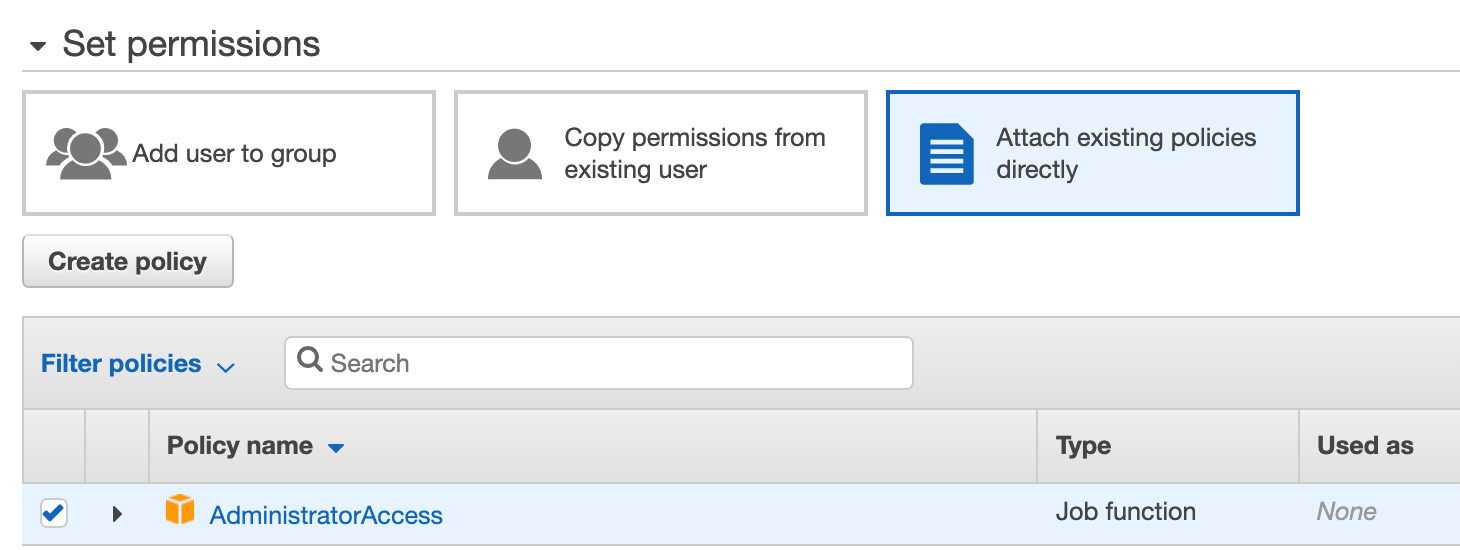
This user now exists, but can’t do anything. For a more in-depth look at IAM (and it does go deep), refer to the same earlier blog about assuming an IAM role. To grant it permissions, we can either create a custom policy with specific and limited permissions, or we can link to existing policies. For the sake of this demo, we’ll use “AdministratorAccess”, but remember this step as another opportunity for extra security in a real enterprise environment.
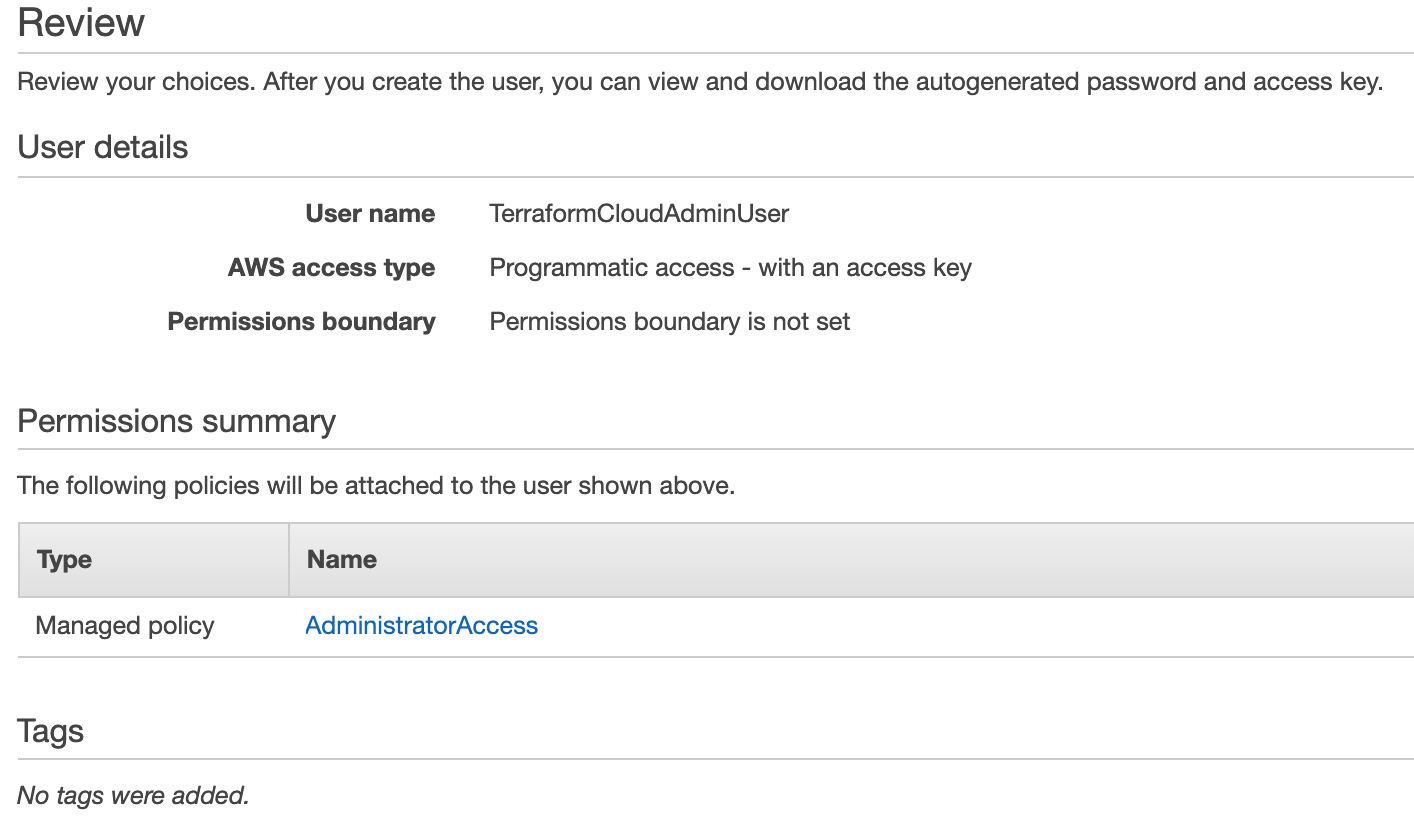
Hit Next Tags in the bottom right, then Next Review. If the Review page looks like the below, hit “Create user” in the bottom right, and we’re in business.
You’re presented with an Access Key ID and a secret access key (behind the “show” link). You’ll need both of these, so don’t close this page.
Terraform Cloud: Plug in AWS Env Variables
Terraform by default can read environmental variables of the access key ID and secret access key, and connect to AWS to do work. This is the easiest method to link the two up, so let’s do it. Back at the Terraform Cloud variables page, let’s build a few variables and populate their values at the IAM user values from AWS that we just created.
Terraform has a great write-up of what we’re doing on this page under “Environment variables”.
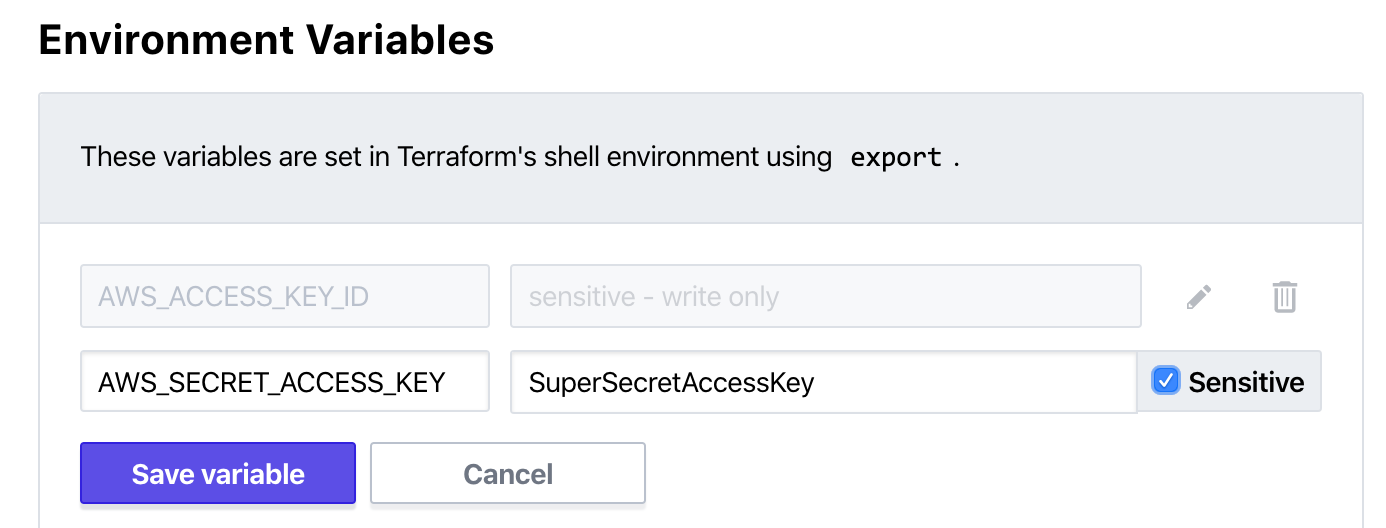
We only need two variables for this to work (since the region is asserted directly from the TF code provider block as us-east-1), so let’s build them.
Make sure to mark both of these are “Sensitive”. Remember, these values grant someone administrative access to your AWS account, and your credit card is linked to this account. For the sake of wallets and purses everywhere, protect these values!
Once done, hit “save variable” and the values will disappear, to be writable (but not readable) only. Perfect.
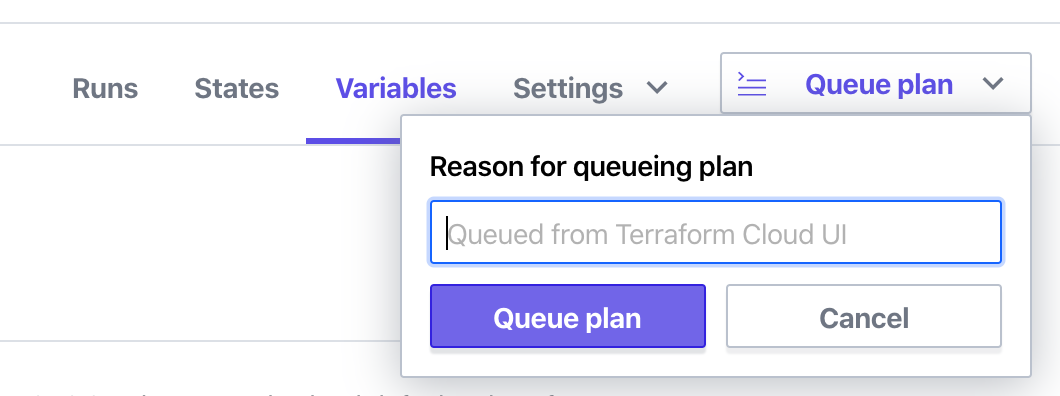
When you feel good about those two variables, scroll to the top and in the top right click on “Queue plan”. You can enter a reason if you’d like, and then click “Queue plan” again.
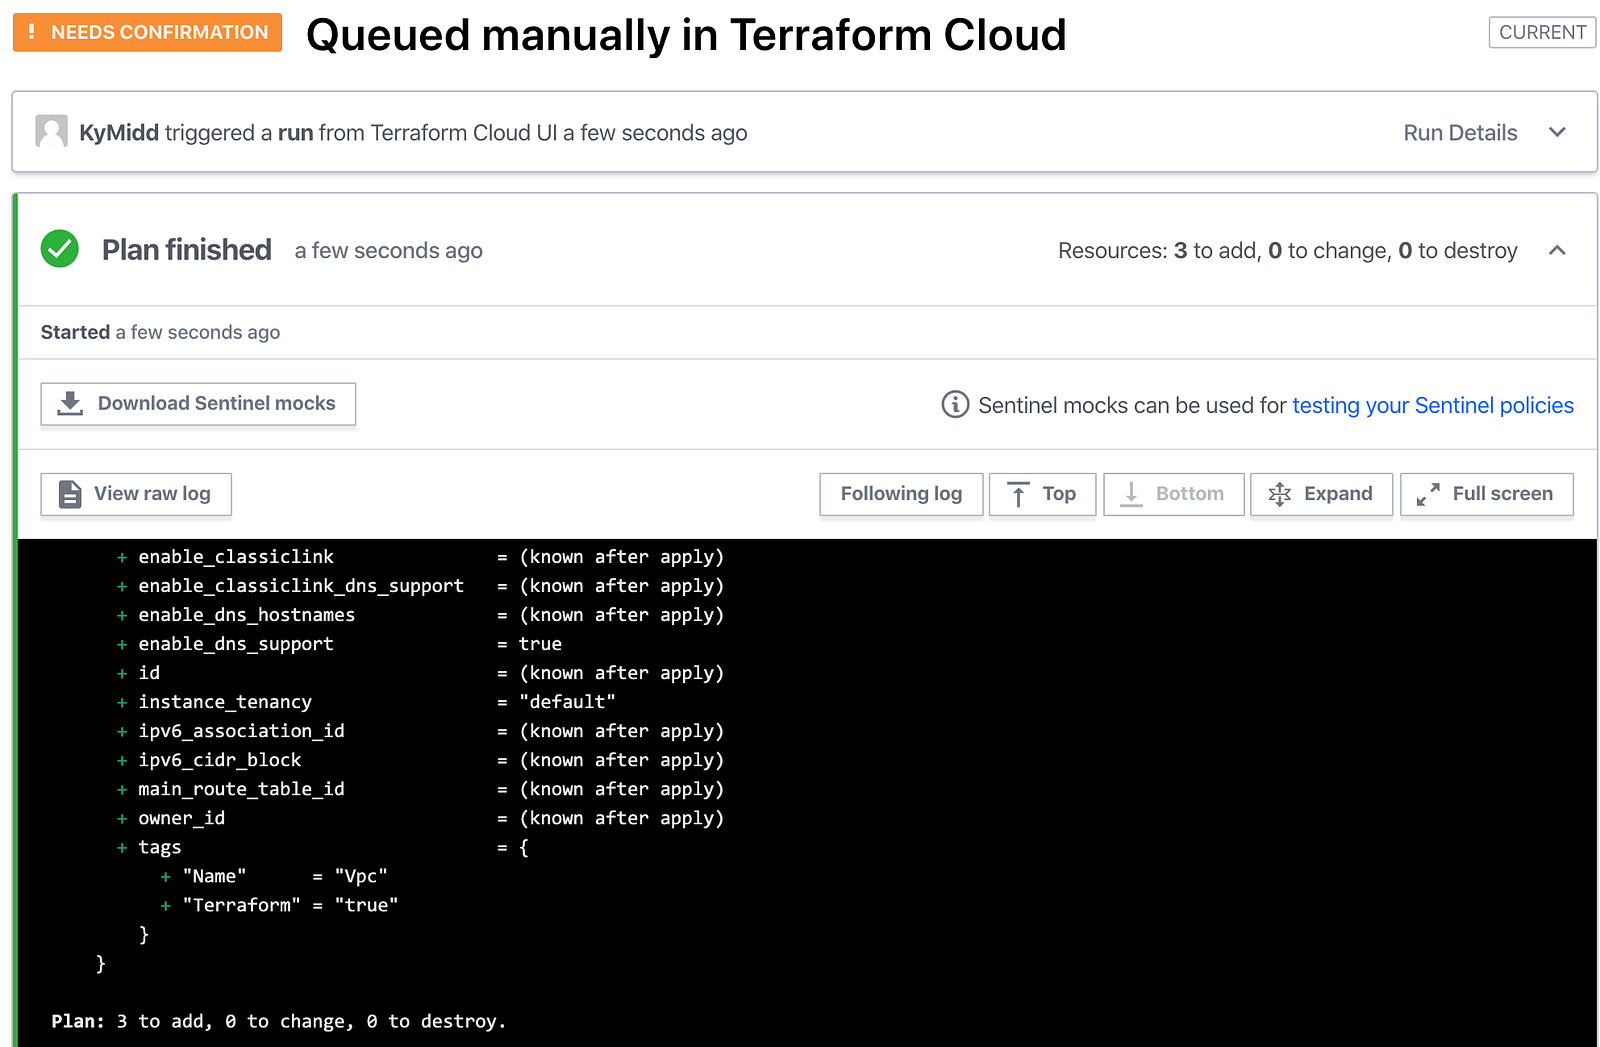
It shouldn’t take long at all before you see the results in your web browser. By default, the Terraform Cloud console will pause when a “terraform plan” has finished, and requires confirmation before building resources. It’ll look like the below. Feel free to scroll around in the plan to see what will be built or changed. Unless you modified the repo in your GitHub, it’ll look exactly like this.
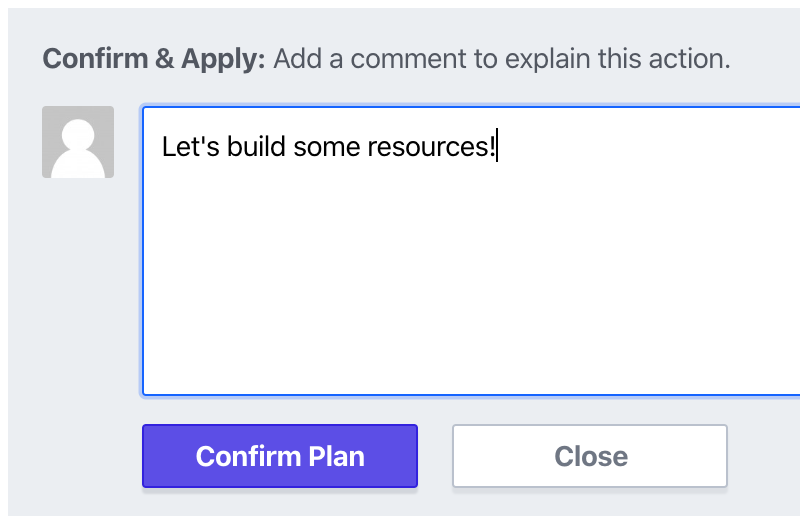
If you want to continue onto building the resources (let’s do it!), scroll to the bottom and click “Confirm & Apply”.
You have the option to enter a comment, and then click “Confirm Plan” to continue to an apply step.
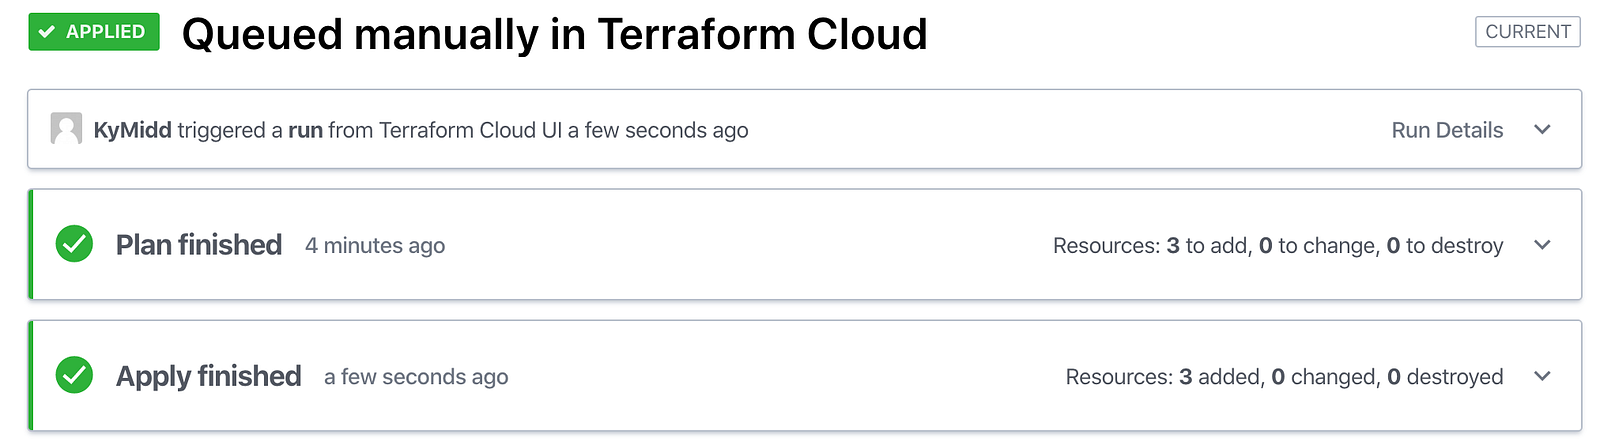
Hopefully, after a few seconds, you’ll see the apply run, and the below photo will show a happy green checkbox that marks the apply went smoothly.
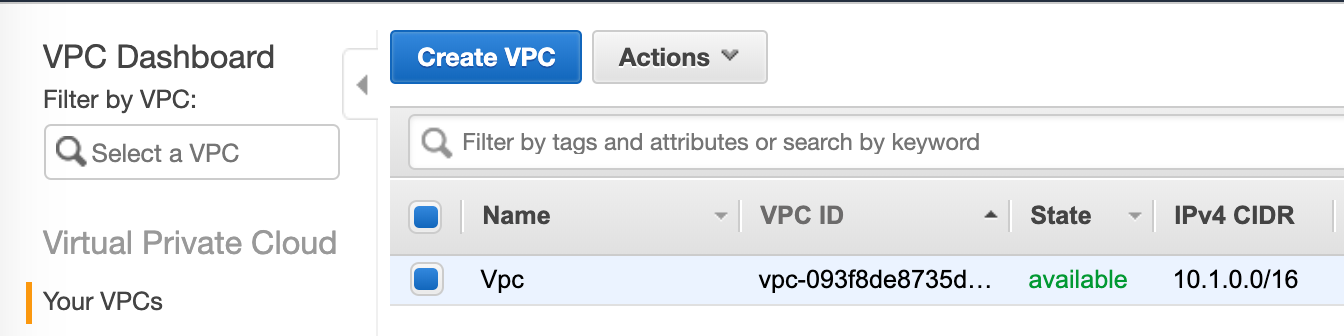
If you switch over to AWS, you should now see the new VPC under the “VPC” console that shows network resources.
We’re in a cool state now. Terraform Cloud is watching your VCS — GitHub, in this case, and when code is pushed or merged into the master git branch, it will automatically (!) execute a Terraform plan. All you have to do to build resources is log into Terraform Cloud, review the plan (optional, but highly, highly recommended), and click “Confirm and Apply”.
That’s the power of Terraform Cloud.
Now — Let’s Burn It All Down
Resources in AWS cost money, so before we close for the day let’s burn it all down. Terraform can run a “destroy” action that will destroy all managed resources, which is perfect for labs and testing. However, it’s not enabled on the pipelines by default — we need to add a variable to enable it. It’s a great safety measure, but one we need to bypass.
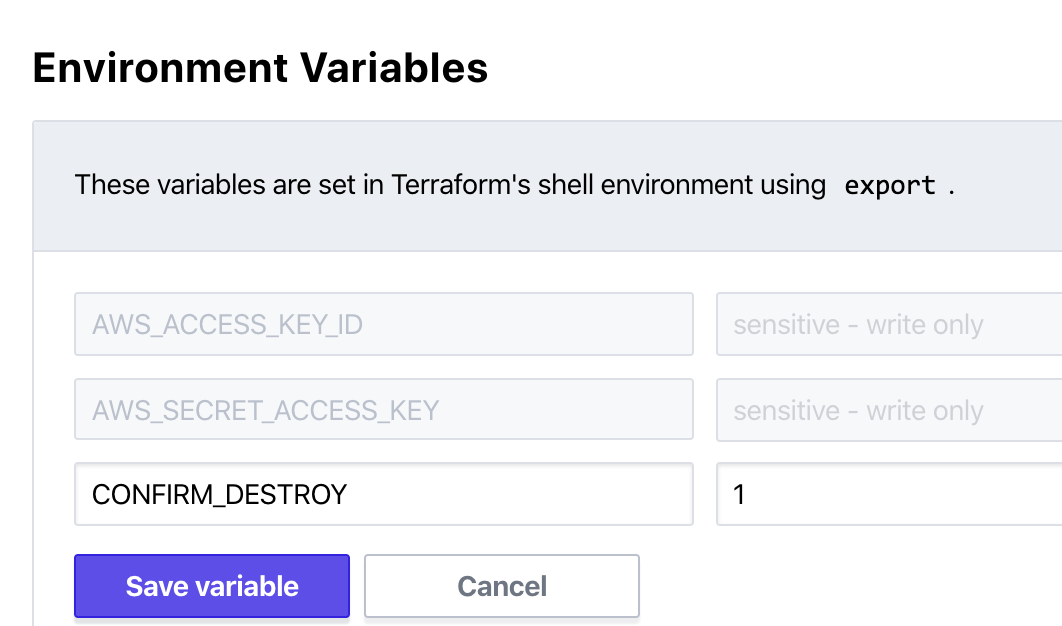
In your workspace, scroll to the top and click on “Variables”. Create a new Environmental Variable with the name of CONFIRM_DESTROY and a value of 1. The value doesn’t need to be sensitive.
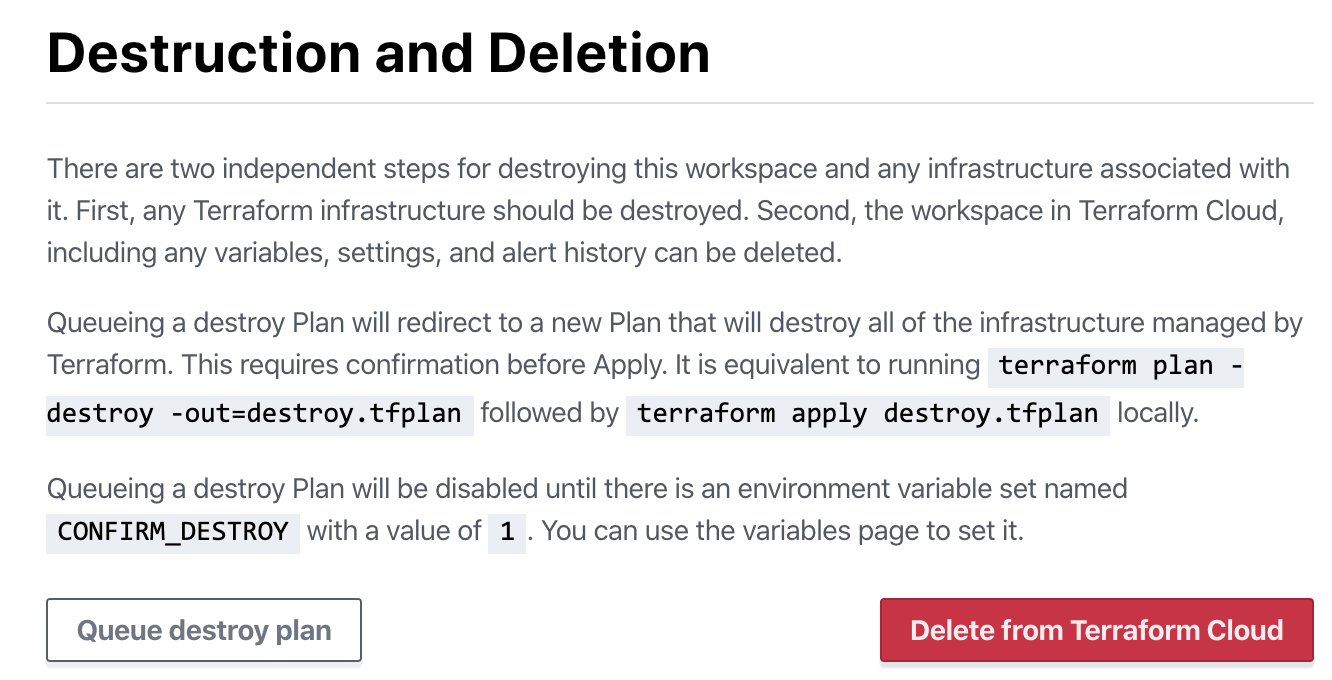
Once that variable is created in the workspace (even if you haven’t run the workspace queue again), you can now run a “destroy” plan. Click on Settings in the top right and then on Destruction and Deletion.
Click the button in the bottom right. Keep in mind, this will DESTROY all the resources Terraform manages in this workspace — great for labs, not great for production.
This runs as a normal pipeline, so you’ll still need to find the run and click “Confirm & Apply” to destroy all resources.
Summary
In this blog, we created a new organization in Terraform Cloud. We created a new GitHub repo with Terraform code for AWS, then linked TF Cloud to GitHub, and told it to watch the repo for any changes.
We created an IAM user in AWS with administrative rights, then programmed it into the TF Cloud workspace.
TF Cloud’s solution is somewhat inflexible compared to other CI/CD solutions, but it is infinitely more simple than the other ones I’ve deployed so far. Check out some of the others that I’ve deployed, and how they compare:
At Blizzard HQ in Irvine, California, both the “Think Globally” and “Every Voice Matters” value plaques have been covered by paper by employees who disagree with the decisions made by Blizzard over the past 48 hours. -Source
Yesterday, a streamer for HearthStone, a game published by Blizzard, announced during a stream that they support the Hong Kong people as they protest against China’s crackdown on their protests. Blizzard moved quickly and decisively… to punish the streamer by revoking money the streamer had earned during the season, as well as breaking a contract with two hosts of a show the streamer was on, though they weren’t aware of the streamer’s intentions and quickly cut to commercial after the streamer spoke.
Here’s a CNET article breaking down the history and story.
This isn’t the first time we’ve seen an American company kowtow to a censor-happy foreign power. The examples of this abhorrent behavior from companies, unfortunately, are coming more and more frequently.
Earlier this summer Nike pulled from sale a model of shoes after the shoe’s designer publicized their pro-Hong Kong views.
South Park earlier this week appears to have intentionally incited the ire of China by criticizing China’s censorship-first policies in an episode named “Band In China.”
Google backed down from building a censored search engine targeted at Chinese and other pro-censorship countries only after massive employee protests roiled over into public dissent in the media. Less publicized are other companies that quietly supplicate themselves to China’s policies (ahem, Microsoft) by filtering their searches to hide results unfavorable to the ruling powers in China.
It Hasn’t Always Been This Way
Though it seems like it sometimes, companies haven’t always put profit first, or chased profits at the expense of all else. In fact, it’s a relatively recent trend — one in the last 50 years.
In 1970, Milton Friedman, a popular and influential economist, made an argument that companies had no duty to serve their employees, or benefit the world they exist in. Their duty was solely to maximize their profit, and minimize their costs, in order to generate the most value.
The name of this paper, “The Social Responsibility of Business is to Increase its Profits” made it clear that Friedman knew that this view would prove volatile, and potentially repugnant to those who felt the increased wealth, stability, and resources of large and profitable companies was to use their attributes as a force for good.
This view wasn’t immediately adopted. Many large companies continued spending some of their dollars to improve the world, or provide employees with more than the acceptable level of benefits, or pay. Shareholders in these companies rewarded those companies that behaved in this way.
However, this view gained traction, and in 1997 a group of influential CEOs calling themselves the “Business Roundtable” announced that the “principal objective of a business enterprise is to generate economic returns to its owners.”
Soon, this philosophy trickled down to companies around the world, as they pushed down labor costs, revoked or reduced benefits, and started to actively band together in washington to lobby lawmakers to also adopt this view, and begin to see companies in a simpler way — one which utilizes their resources to make money at the smallest expense possible.
What Can I Do?
It’s the responsibility of all of us to stand up to companies that behave in this way. We don’t have lobbyists in washington, but we can vote with our dollars. Stop spending money on companies and countries that behave in ways that are unethical.
There is now a strong push for companies to operate in an ethical way, and consumers are starting to take notice. Companies like Ethical Consumer have sprung up to help consumers find products and companies that behave in a more ethical way.
Also, companies are comprised of employees. Seek our companies that treat their employees well and abandon companies that don’t. That’s clearly harder than it seems — we all have to pay our rent and eat. But look for exits from companies which come to light and are doing unethical things.
Techies in particular don’t recognize their power. Technical folks are an incredibly powerful force for change — look at the protests at Google that led to real change at the company.
A card-sorting system IBM built for Nazi Germany, displayed in the United States Holocaust Museum in Washington, D.C.
These folks are also the most vulnerable — they rarely recognize the tangible consequences to their actions — an often repeated example is how IBM built a tracking computer system for the Nazis that was used to catalog and manage the Jewish prisoner populations as they were shuttled and kept at concentration camps.
Recognize your power. Speak up. Show your values with your dollars and your votes. Together we can do something.
I am just awful at watching training videos and remembering the content. Which feels like a fair trade-off from the world for my ability to remember most things that I read with good fidelity. A place where this problem comes to an (unexpected) head is in DevOps and cloud architectures.
AWS and Azure are moving so fast they have trouble keeping up with written documentation. The written documentation usually exists, and isn't terrible, but is usually missing the most recent iterative developments.
Especially as a network engineer, the old model for architecting a system was to sit and read the architectural books. OSI standards don't really go and change on you, so the information can be presented in many different ways, boiled down by excellent authors, and presented in an accurate way that'll stand the test of time.
For instance, I know when I started studying for a CCIE (Cisco expert networking certification) one of the most recommended books to purchase and study was a volume that came out in the mid 90s, when I was learning how to tie my shoes and starting to read chapter books.
...the pace of iteration and invention within the technology space is increasing.
But I'm sure most of the folks reading this from technology fields feel this - the pace of iteration and invention within the technology space is increasing. Every week it seems like a new cloud functionality is released that layers up what that provider is offering, or a new devops framework, module, or practice is developed that can help increase the efficiency of what you and your team are doing.
That's not to say that the old methods and tools you're using will be deprecated (although it sometimes does!), but usually that you're designing for the state of the art from weeks, months, or years ago, and your competitors might be designing for the state of the art today.
It has a tremendously negative effective on the "tribal knowledge" of a team as new tools and practices are implemented. No longer does the cisco networking guru stay at the top of their game just by renewing their CCIE every few years with the same knowledge they had years ago - now we're trying to level up as fast as we can, and so is everyone else.
...we're trying to level up as fast as we can, and so is everyone else.
So Let's Do It Wrong
Which brings me to my point. The tools and technologies we use aren't going to slow down, and the documentation around them will continue to be sub-par. There's no way to become a paper expert at "cloud" or "devops" - the only way to get there as an expert is to DO it.
So deploy your own cloud, learn how your devops tools work by doing it wrong, and then iterating, and then doing it a bit less wrong, etc. Each time you do it wrong you learn a valuable lesson that can't have been learned elsewhere.
Each time you do it wrong you learn a value lesson that couldn't have been learned elsewhere.
So GO - build, break, iterate. Let's build this thing.
kyler
Terraform has the ability to call modules, which are snippets of terraform code that can be passed information to build resources. Generally these modules enshrine best practices, and help to keep your DevOps teams on-track in terms of resource nomenclature, structure, and security guidelines.
Modules also have the ability to contain multiple resources, and be passed a "count" variable, which will lead to several similar resources being constructed.
In this blog I'll share code for an AWS subnet and route-table association module that can accept a count variable, and build "n" number of subnets. New subnets are as easy as updating the count variable and updating the list of subnets passed to the module.
But enough talking about the cool thing, let's build it.
Modules Overview
Creating a module is as easy as saying "hey, terraform, call this module, here's where it lives, like this:
That'd work just fine, however there's much more power in modules when we pass information to them. Imagine calling an ec2 module and passing the subnetID, AMI, size of subnet, etc to it. That makes the module a lot more powerful.
You can imagine how extensible this solution is. For example, here's the finish module call we'll be building today:
We're calling a module that builds subnets, we're telling it a "group" to use in naming of the subnets, availability zones, subnet addresses, route table, oh my! The module has to be written to accept and use all these values, which is the tricky part. So let's jump into that.
Iterative Modules - The Secret Sauce
Writing modules isn't terribly hard - you tell it what values to accept from the caller, and assign those values to fields that terraform accepts, and boom, you have a functional module. However, that module can only build a single resource. Telling it to build several resources in a cogent way is some engineering, some creativity, and some luck. It starts with the "count" parameter.
Count is a built-in terraform variable that terraform uses to know how many times to loop over the same resource and build it several times. This built-in loop within terraform is exposed to the resource via an "index" attribute that tells the loop how many times the loop has run.
If that's made your head spin, that's okay - we'll walk through it with examples. First, let's take the subnet module a few lines at a time. Here's the start of our subnet module, and we're building a subnet resource. We're also using the count attribute we just talked about, but rather than assigning it by hand (which would work fine, as long as we remember to update it for each new subnet!), we're going to pass the number of items in the subnet_addresses list instead using the length function. Basically, we're saying to terraform, "If there are 3 subnets in the subnet_addresses list, iterate 3 times and build 3 subnets."
You can also see that the VPC ID is just specified like you would in any normal non-iterative module. That's because that value will remains static across all the subnets we build.
Let's add one more line - the variable that tells terraform the CIDR address of this subnet. Now, this item needs to change depending on which iteration of the loop we're on. So we tell terraform to pick up the variable passed to this module called subnet_addresses using the element function, of index whatever number of the loop we're on. So if we pass this module an array of "1, 2, 3" and the loop is on iteration 3, it'll pick out the 3rd item in the list, and use the value "3".
You can use those index values to interpolate also. It makes a lot of sense to me to name the subnets starting at 1, rather than 0 where a computer starts counting, so we interpolate the loop index value, and add 1 (so 0 becomes 1, and 1 becomes 2).
And boom, that's our iterative module. However, we also need to associate the subnet to a route-table. Check out the second half of this module and see if you can pick out where iterative looping is done, where interpolation and value modification is done, and follow along.
Notice also that when we're calling the subnet module above, we're only 2 availability zones and 2 route tables. How is the subnet module dealing with only having 2 values when it iterates 5 times? The answer is that lists inherently loop. So if a list contains value "A, B" and the loop is called 5 times, loop 1 will be A, loop 2 will be B, loop 3 will be A, and so on.
Outputs - Splat!
Normally, a module can output a static number of resources, so outputs are easy to write. However, in an iterative module, any number of resources can be created. Outputs don't support the "count" parameter in the same way resources do, so we have to use another creation of Terraform's - the Splat expression.
Here's what our output looks like in this subnet module:
So within the subnet module, that's how you'd export ALL subnet IDs. But say you wanted to reference one of the subnets from the main.tf? It'd look like this - referencing the array value and module name from within the main.tf file:
Go build some cool iterative modules! Imagine building a dozen ec2 instances, and standardizing their names, security settings, and managing them as a single flexible unit. The possibilities are endless.
Terraform is capable of remarkable things, not least of which is speaking API commands for many dozens of providers, which lets terraform configuration do amazing things. That isn't to say that terraform is perfect, or as flexible as we'd like it to be, which is why some free-lancers have built wrappers around terraform to add functionality.
One that has gained significant traction is Terragrunt. Terragrunt is a tool that permits terraform to run in parallel, on lots of different main.tf files, and to go even further towards a DRY (Don't Repeat Yourself) implementation with sym-links to shared files. The github page for the tool goes into greater depth and specificity than I'd be able to, so visit it if you're interested!
Terragrunt also permits something cool - to recursively dive into a folder structure and execute all the main.tf files that are found there. Terragrunt can also manage each of these files' state files and help store them in an appropriate back-end.
This recursive property lets you separate your resources out into n number of data stacks, all with separate state files. This is particularly useful within the context of a CI/CD that has to be hard-coded to execute a single or few commands, e.g. terraform against a single location. If your users are going to be adding main.tf files with new resources in new folders, you'll have to constantly be updating your CI/CD to point at those new main.tf files. Or you can use terragrunt and tell it to dive into a folder structure recursively and grab them all, each time its run, automatically.
During this blog I'll walk through how to set up terragrunt, how to separate resources and reference them from different main.tf files, all in the context of what I hope is) an interesting example - building public and private subnets, 2x servers, a load balancer, listener, target group, and all sorts of other cool stuff. At the end of this demo, you'll have an internet-facing Application Load Balancer in AWS that can accept incoming http connections and load-share them between the 2x ec2 servers we'll build.
AWS Bootstrap - S3, IAM
Before we can run terragrunt against an AWS environment, we need to add some resources, which would include an S3 bucket to store the remote state, as well as an IAM user with a policy that lets them do things.
First, log into your AWS account and in the top right, click on My Security Credentials. This is your root user, with unlimited abilities. We don't want to do a ton with this, but we'll use it to get started
Then click on "Access keys" drop-down to expose your keys. If there aren't any there, that's fine.
Click on "Create New Access Keys", then on "show access keys". Copy those down, then export them into your browser session. These exports will work on a linux or mac computer - you'll need to export in windows syntax for a windows session.
That will permit your terminal to authenticate to your AWS and do things.
Navigate to projects/ado_init on your local disk and update the ado_init_variables.tf file with custom names. The S3 name has to be globally unique, the rest are whatever names make sense to you.
Then run "terraform apply" against the main.tf there. It will build an S3 bucket and the IAM user with policies that you can assume.
Find that IAM user in the IAM panel, click on Users on left side, and find the new IAM user that we built. Click on it to open it up, then click on "Secure Credentials". Click "create access key" to generate some CLI creds.
Now we're ready to get started in terragrunt, so let's dive in!
Terragrunt Properties
Terragrunt is written in the same language as Terraform - HCL, so it'll look very familiar. Here's an example of a "terragrunt.hcl" file that exists in the networking folder of my terraform project.
Notice that it looks exactly like how a remote state backend is written in terraform. And rather than having all this information in both places, terragrunt requires us to remove that information from the terraform main.tf file. Really all that's left in the terraform file is the terraform init statement.
Here's what my folder structure looks like. Notice that there are several different "projects", which are components of my environment, broken out into main.tf files. All are under the "projects" folder, so that's where we can run our terragrunt commands.
Each project component will have its own terragrunt.hcl file, but they'll vary slightly. The reason for this is that each one will maintain a separate state file. Here's the terragrunt.hcl file for the security_group project. Notice that the s3 bucket stays the same - we're putting all our remote state files into the same s3 bucket, but the "key" (folder path and filename) changes, as well as the dynamo-db table.
You'll need to sync down the Terragrunt git repo for this demo to your local comp.
Go through the various terragrunt.hcl files and update the S3 bucket to the one you created in the ado_init step earlier. You can also update the name of the dynamoDB table if you'd like - terragrunt will automatically create these for you if they don't exist yet.
Now it's time to run it!
Run Terragrunt
Navigate to the projects folder and run command "terragrunt apply-all". This command will tell terragrunt to recurse through the directories and execute the main.tf files in each directory that has a terragrunt.hcl file. It'll read the terragrunt.hcl file in each directory and grab (or push) the terraform state to that remote location.
You'll see log messages from each of the main.tf files as it goes, and it can sometimes be hard to tell where the log messages come from.
You may need to run the command a few times - there are inter-dependencies among the several files, and some files can't execute at all when their data sources reference something in a data stack that doesn't exist yet.
Try it out and let me know what you think! Good luck out there.
kyler