I was able to participate in a podcast discussion for NetworkCollective with Nick Russo and Craig Stansbury to discuss the new Cisco DevNet certifications and what it means for Cisco and the broader IT industry. Please listen in!
Find it here
Wednesday, April 8, 2020
Monday, March 23, 2020
HashiTalks2020: Enterprise Deployment to Azure and AWS in Azure DevOps
Hey all!
Here's my #HashiTalks2020 presentation about my company's transition from single-cloud, single-devops to cloud agnostic Terraform and multicloud Azure DevOps, pipeline and infra-as-code environments.
This deep dive video is 25 minutes long.

If you have any notes or comments please let me know!
kyler
Monday, January 13, 2020
Intro to TravisCI With Terraform
Picture-heavy walkthrough of building a TravisCI terraform pipeline. It does everything based on GitHub events.
And it has a kickin' rainbow theme. What else could you ask for? Check it out:
https://medium.com/swlh/intro-to-travisci-with-terraform-80e65cf975fe
Paywall bypass: https://medium.com/swlh/intro-to-travisci-with-terraform-80e65cf975fe?source=friends_link&sk=814896cf82cdac07cba5c2e44c42941b

- On a new PR created/updated: run a terraform validate and plan, report status back to GitHub.
- On a PR merge: run a terraform apply, deploy resources.
And it has a kickin' rainbow theme. What else could you ask for? Check it out:
https://medium.com/swlh/intro-to-travisci-with-terraform-80e65cf975fe
Paywall bypass: https://medium.com/swlh/intro-to-travisci-with-terraform-80e65cf975fe?source=friends_link&sk=814896cf82cdac07cba5c2e44c42941b

Friday, January 10, 2020
Azure DevOps YML Terraform Pipeline and Pre-Merge Pull Request Validation
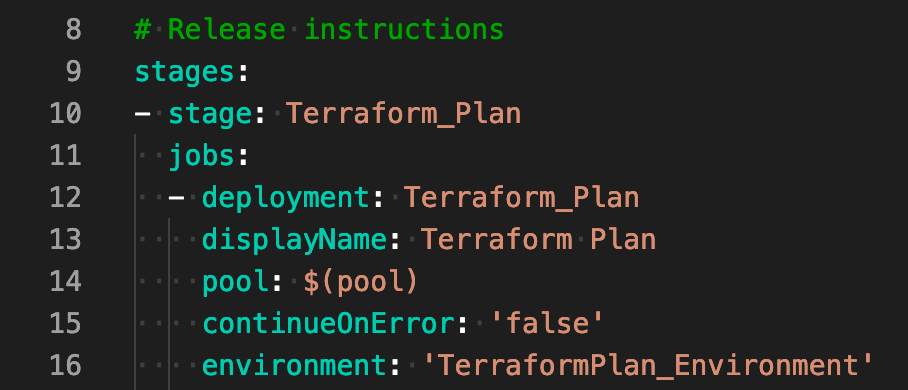
tl;dr: Here’s YML code that will build an Azure DevOps pipeline that can be run automatically as part of pull request validation (pre-merge) and requires manual approval by definably admin groups in order to proceed to touch resources.
Microsoft’s Azure DevOps (ADO) is an incredibly powerful CI/CD platform that is being rapidly developed by $MSFT. However, as with any rapidly-evolving product, the documentation sometimes leaves something to be desired. I solved a few problems with the help of the Azure DevOps development team and I thought I’d share my solutions. Hope they help.
Bootstrapping Azure Cloud to Your Terraform CI/CD
Pairing Terraform with a CI/CD like Azure DevOps, Terraform Cloud, or GitHub Actions can be incredibly empowering. Your team can work on code simultaneously, check it into a central repo, and once code is approved it can be pushed out by your CI/CD and turned into resources in the cloud.

Intro to Cisco ASAv in AWS With Terraform

Intro to AWS CodeCommit, CodePipeline, and CodeBuild with Terraform
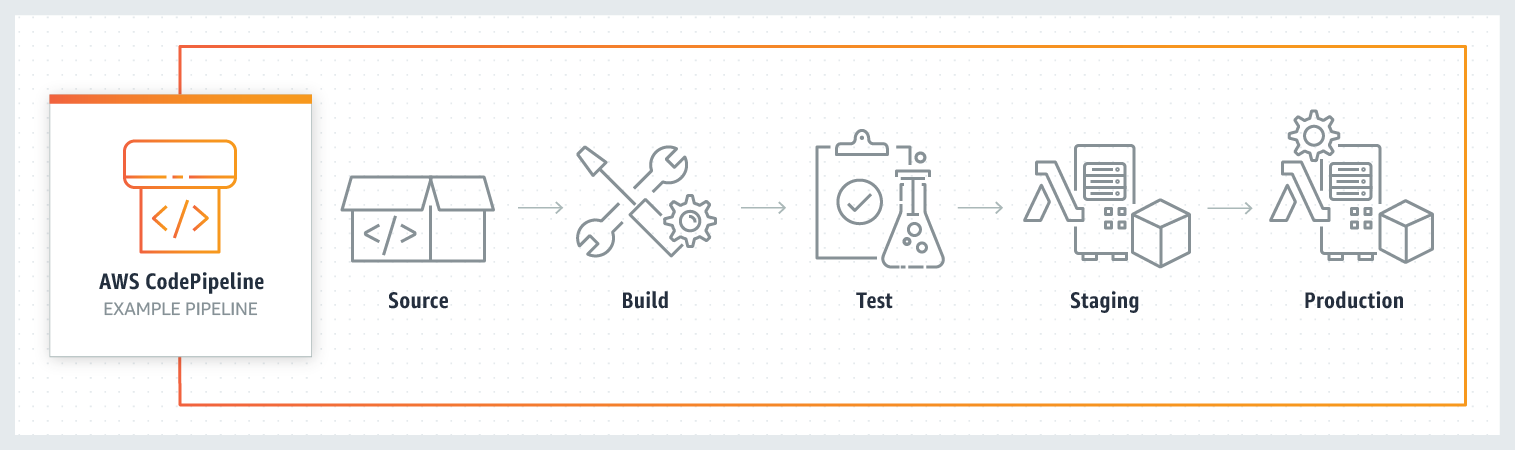
CodeCommit: A managed git repo. We’ll check our terraform code into a repo hosted in Codecommit. Enough said.
CodeBuild: A managed continuous integration service. It runs job definitions, dynamically spins up and down build servers, and can support your own tooling, i.e. terraform! We’ll write a deploy terraform build in CodeBuild.
CodeDeploy: A managed deployment service that helps push code from a repo to AWS services where it can be executed. This is the only CodeX service from AWS we won’t use.
CodePipeline: A managed deployment service that supports complex deployment processes including code testing, automated deployment all the way to production. We’ll write a pipeline to automate a PR merge → terraform deploy.
Scrape AWS Public IP Json + Ansible + Cisco Firewall

Every data center I’ve ever worked at has had some sort of egress internet filtering for security. This makes perfect sense in a world where partners have static IPs, or even when partners can provide the range of IPs they have registered with IANA. But in the cloud world? Not so much.
An Intro to GitHub Actions + Terraform + AWS

GitHub, the ever-present cloud code storage tool, entered the CI/CD market in mid-2019. Their killer feature is that your code is probably already stored in GitHub, so why not have them manage automatic actions natively, rather than relying on other more complex methods like webhooks, or web scraping?
https://medium.com/swlh/lets-do-devops-github-actions-terraform-aws-77ef6078e4f2
An Intro to Bootstrapping AWS to Your Terraform CI/CD

Let’d Do DevOps: Build an AWS CI/CD with Terraform Cloud and GitHub
This blog series focuses on presenting complex DevOps projects as simple and approachable via plain language and lots of pictures. You can do it!

There are many platforms springing up that want to run your CI/CD to store your Infrastructure as Code codebase and execute it to build and manage resources. These products vary to a great degree in what they can do and what they cost. Most of them are available from the cloud providers who provide the service for almost no cost as a gateway to you buying CPU cycles at their cloud.
Because their vested interest in you utilizing their CI/CD is tenuous as best, there are two major drawbacks to these cloud-specific CI/CDs:
- They focus on the local cloud — For instance, Microsoft’s Azure DevOps has great, native integration with the Azure cloud, but you better know what you’re doing to get the AWS side of the house to work, and work reliably (and a CI/CD must work reliably)
- Features are deployed as a “box-checking” measure — Sure, Azure DevOps can technically support cross-project plans and graphical designs, but the feature deployments are minimal and prone to breaking and limitation. Sure, the CI/CD technically support these features, but in practice, they don’t work well
This is probably because building the first 50% or so of a CI/CD is pretty easy. Git is a mature and open-source code replication and merge logic protocol, and executing executions against the master branch using common configuration deployment tools, like Terraform is easy. But what about cross-repository code access and versioning, RBAC and AD-integrated permissions management, and pull request validation and approval check-pointing.
Clearly, this is a problem where the second 50% of the problem can be very difficult to solve. That takes a concerted effort that the cloud providers simply aren’t incentivized to solve very quickly. However, there are other potential entries into this space that are much more incentivized to get into this potentially lucrative market, including Github (GitHub Actions), Azure DevOps and Pipelines (which I’ve written about extensively), and what I’ll be focused on today — HashiCorp’s Terraform Enterprise.
Yep, the company behind Terraform is getting into the SaaS continuous deployment game. They don’t yet offer a code storage platform (though it’s got to be coming soon), but their integration into most other popular SaaS git repositories means it hardly matters.
In this blog, I’ll walk through deploying terraform code into a GitHub repo, integrating that repo with Terraform (TF) Enterprise, building a workspace in TF Enterprise to execute the terraform code and store the TF state, and push the changes out to an AWS account.
Lots of cool stuff to get to. Let’s get started.
Find the Terraform Cloud, Build your Org
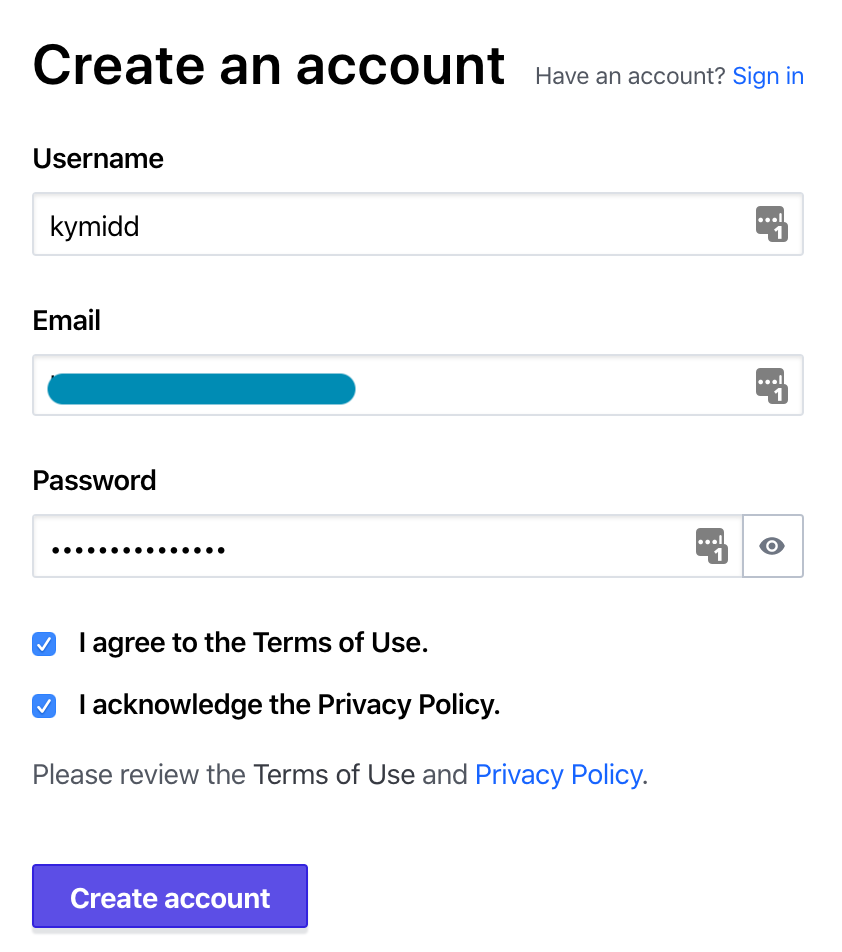
Let’s find the Terraform Cloud web page here and create an account.
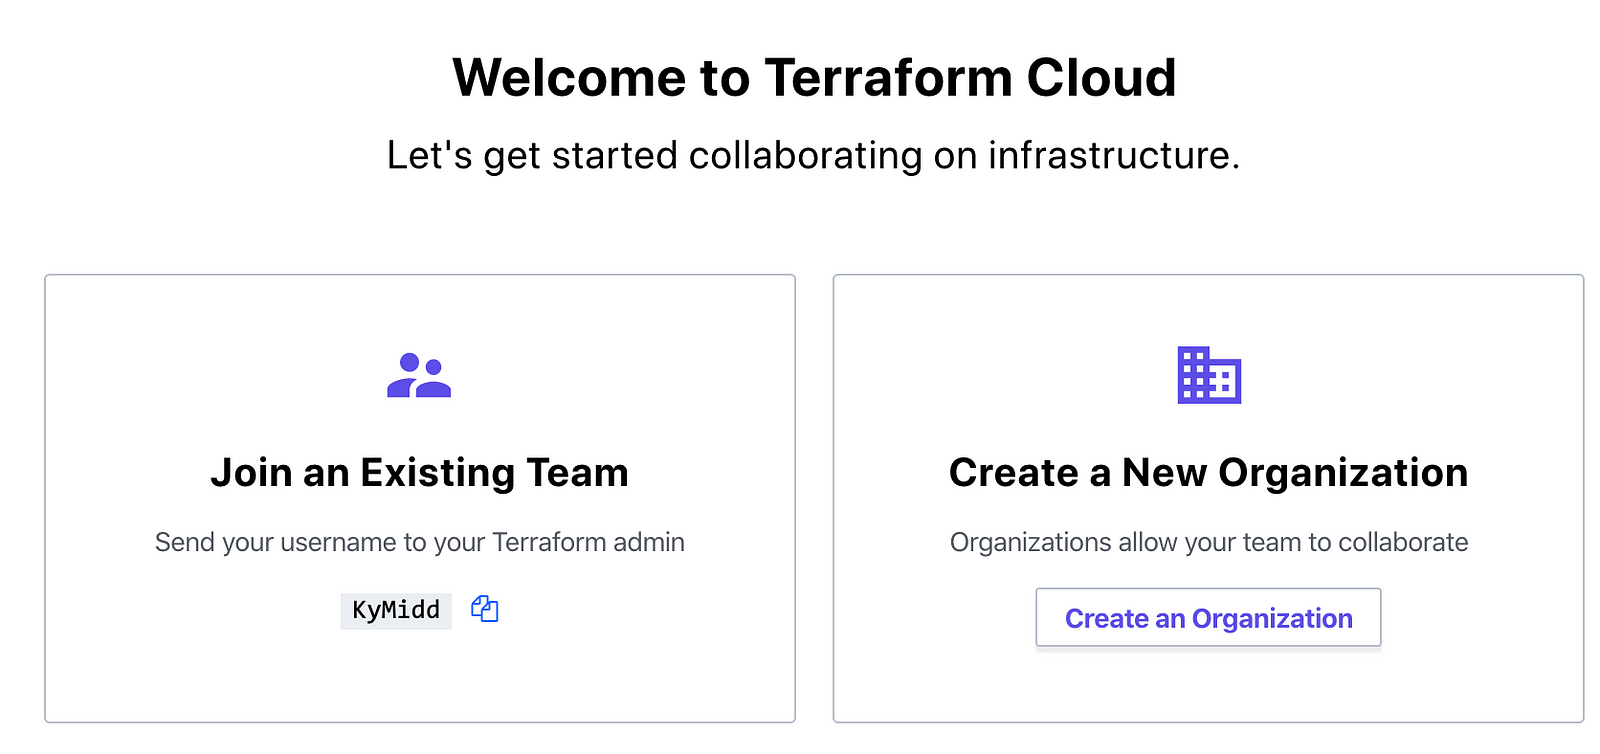
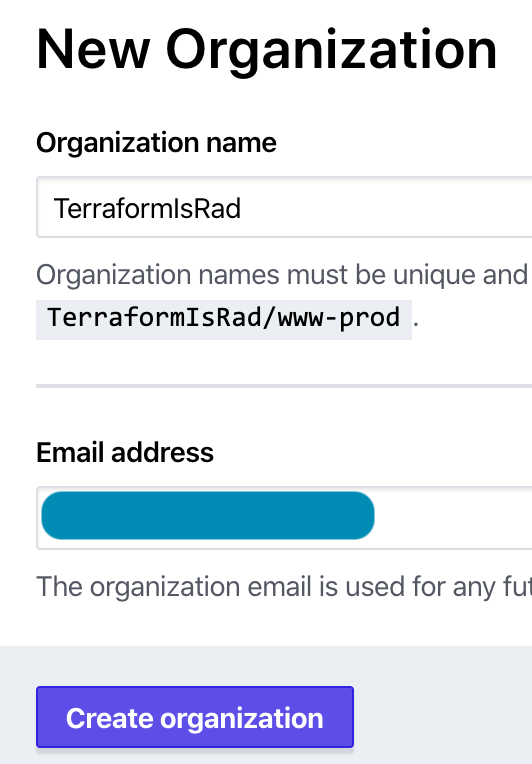
Now that you’re in, you have a choice — you can join an existing team, if someone at your biz has already built something on this platform for you to use. If you’re the first one, good for you. Let’s assume you’re pushing into something cool and new, and build our own organization.
Create any name you’d like for your organization. It can only be changed later by deleting your entire organization and all settings and creating a new org, so make sure you’re happy with it before proceeding.
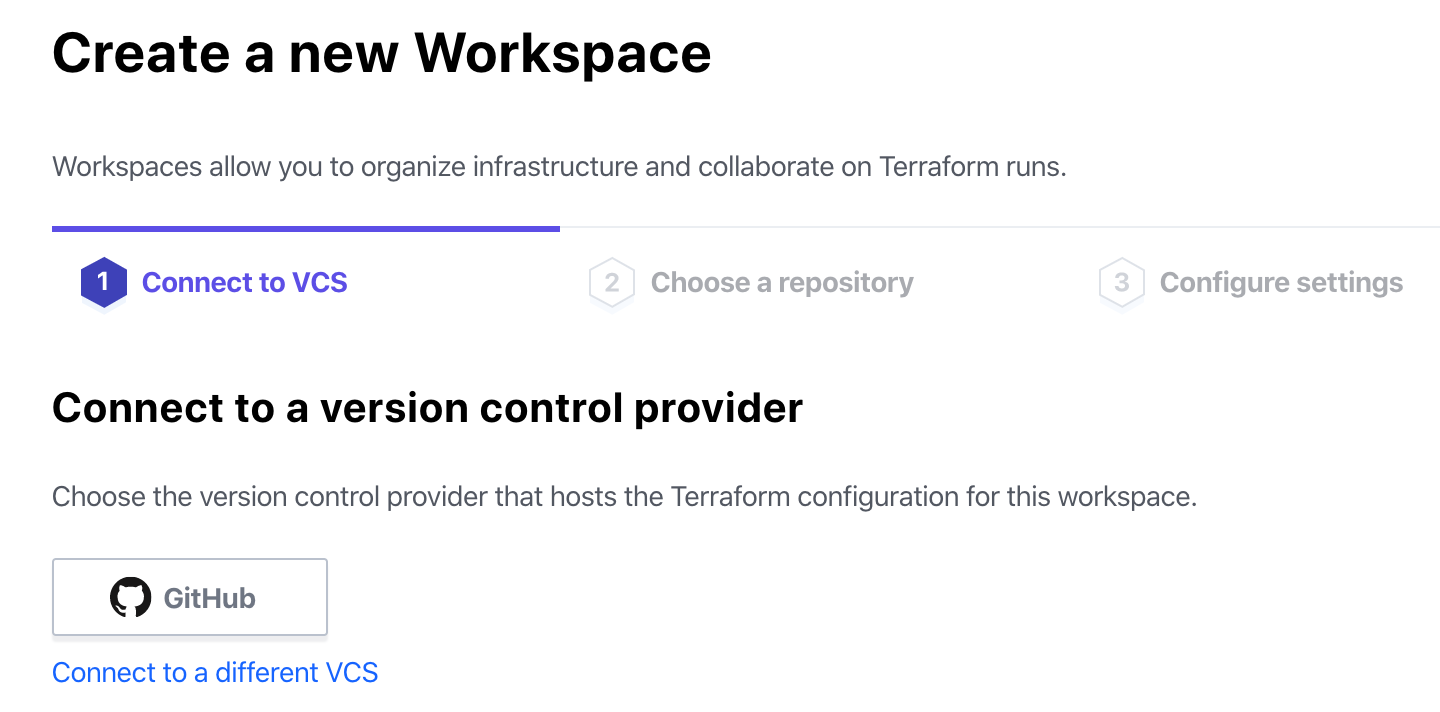
The first step Terraform Cloud walks you through is to create a workspace, which involves linking to a VCS (Version Control System) like GitHub. But we’ve skipped the step where we build that, haven’t we? Let’s go create a GitHub repo where we can store our code.
VCS — Let’s Create a GitHub Repo
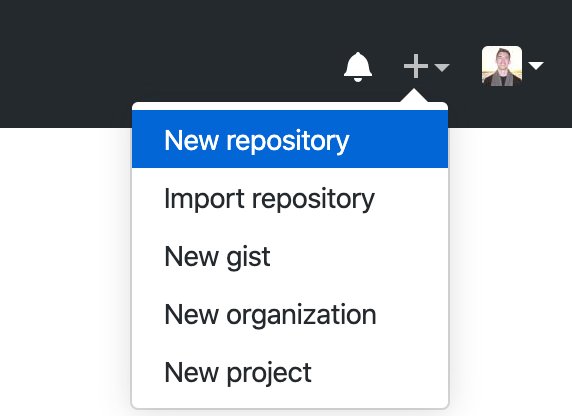
If you’ve never had a GitHub account, go get one! #CodeIsLife. When you’re done, come back here and we’ll create a repo.
After logging in, click in the top right on the plus sign, then on “New repository”.
Name the repository — it has to be unique within your account. You can add an optional description, and set whether the repo is public or private. I’ll start with public for now since it’s simplest. Since actions will be made automatic based on code uploaded to this repository, it’s a good idea to look into Private repositories and how to use them. Don’t choose either of the “initialize the repo” options at the bottom.

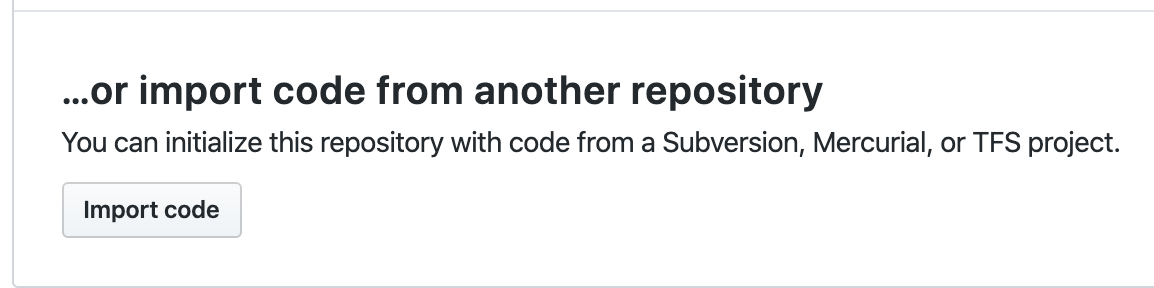
The repo is now empty and needs to be initialized somehow. GitHub has a handy feature that can replicate code server-side from another project. We can use my public-facing project with some basic AWS terraform config and a basic .gitignore file. Let’s choose “import code” option at the bottom.
Enter the public repo for our base AWS code (or upload your own valid TF AWS config) by entering this URL as the old repository’s clone URL: https://github.com/KyMidd/TerraformEnterpriseRoot. Then hit “Begin import”.
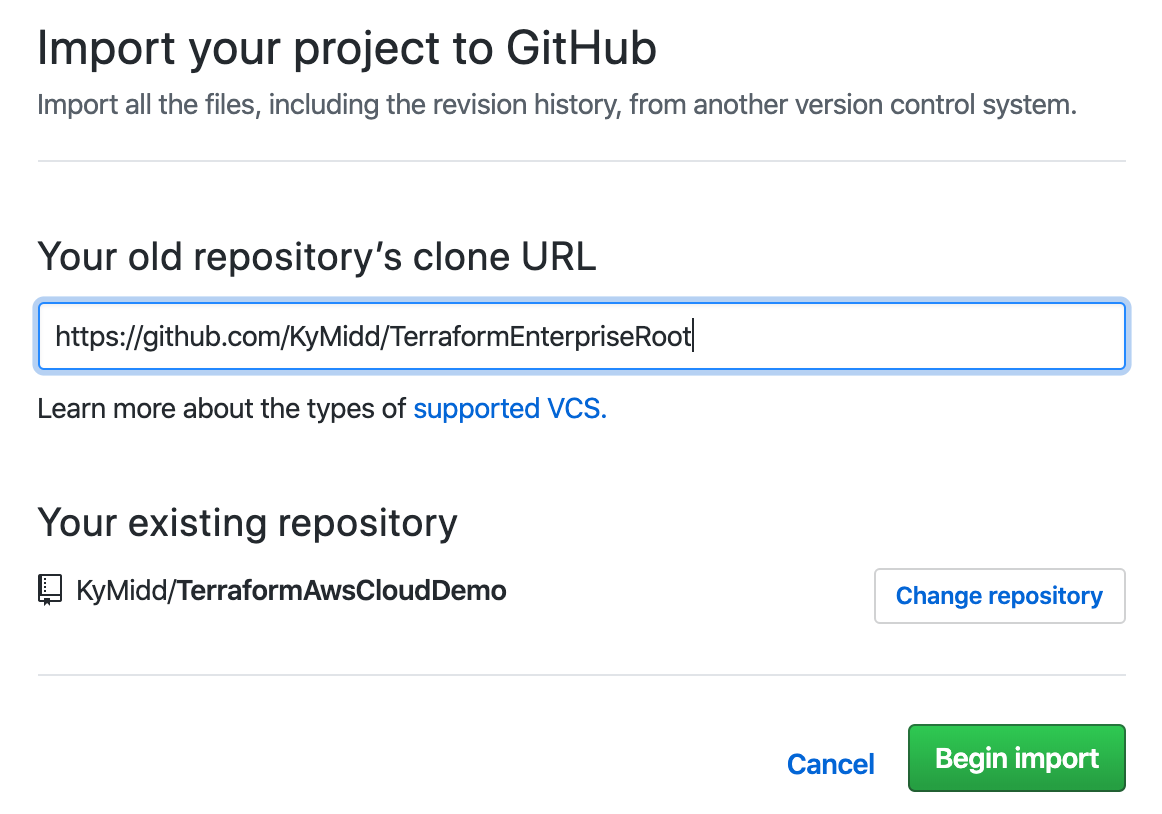
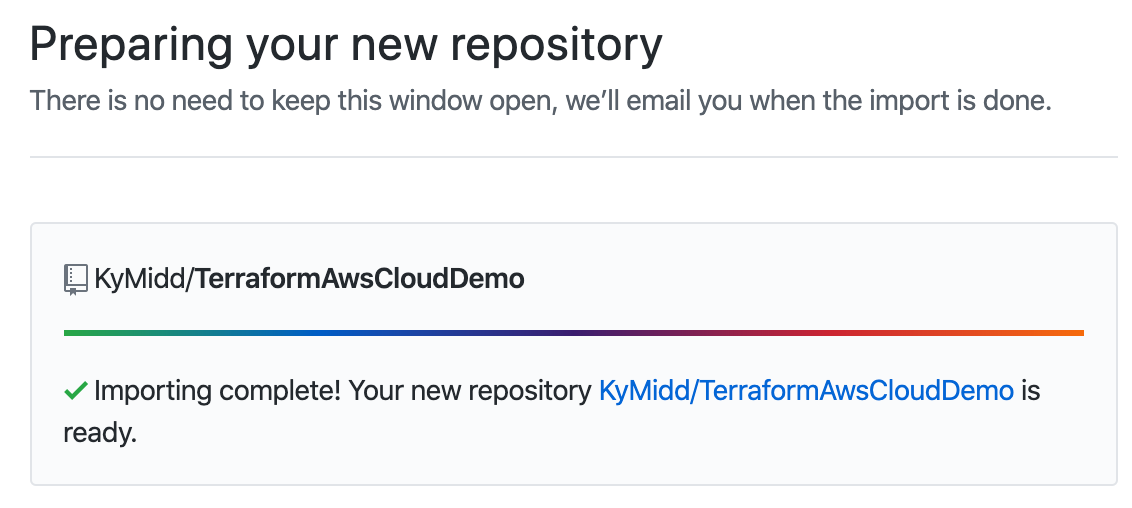
After about 2 minutes, you’ll get an email that the import is done. You can refresh your page to check the status also. You can click on the link to see your repo filled in. Take note of your repo’s URL — we’ll need to link Terraform Cloud to it in a minute.
Back to Terraform Cloud — Link GitHub
Back at the Terraform Cloud page, we’re creating a new workspace, and still on step 1. Now that GitHub is ready, select that option to move forward.

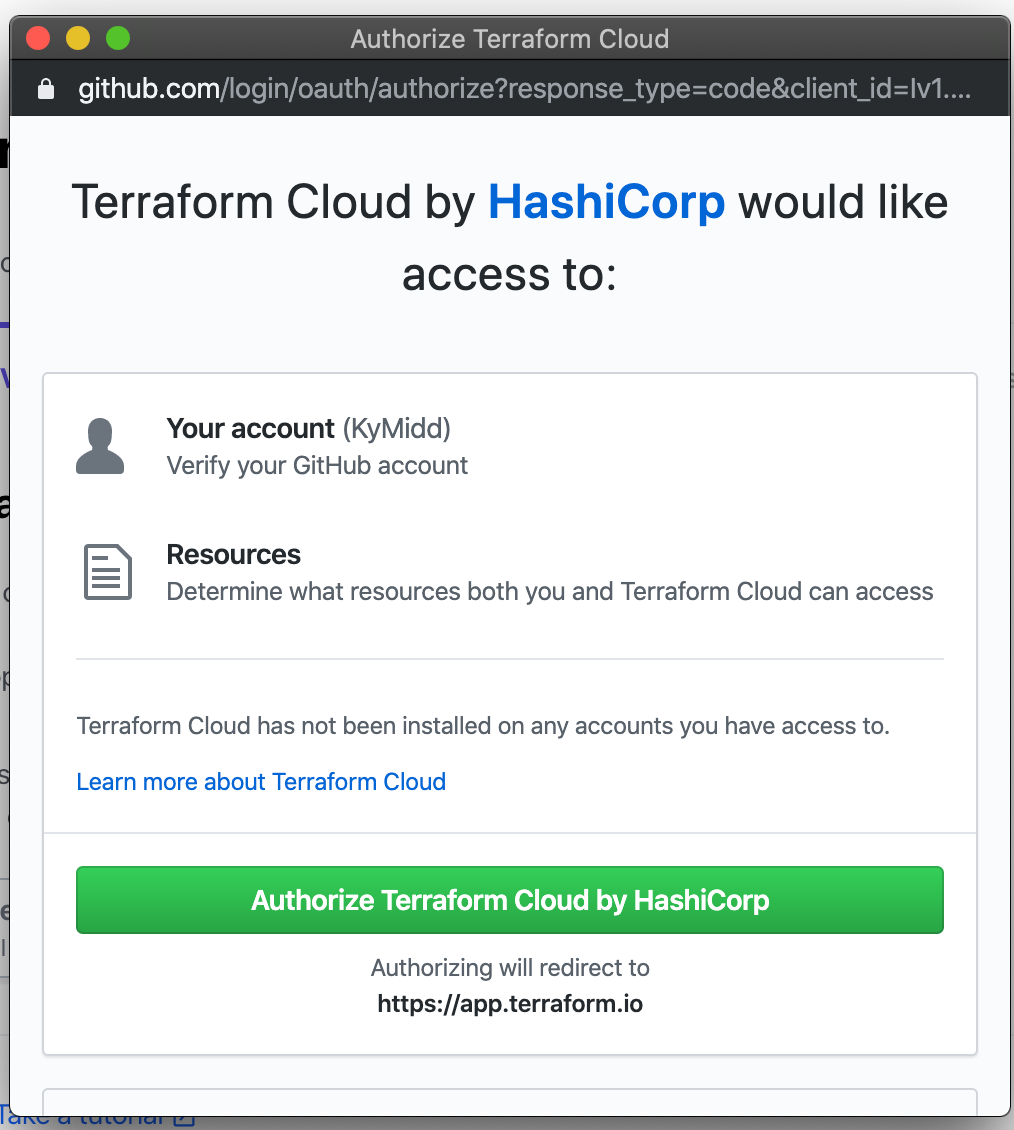
Terraform Cloud will launch a smaller authorization window, where you’ll be prompted to authorize Terraform Cloud to access the code in your GitHub account. The permissions here are broad, but don’t worry — you can limit them in the next step. Click “Authorize Terraform Cloud by HashiCorp”.
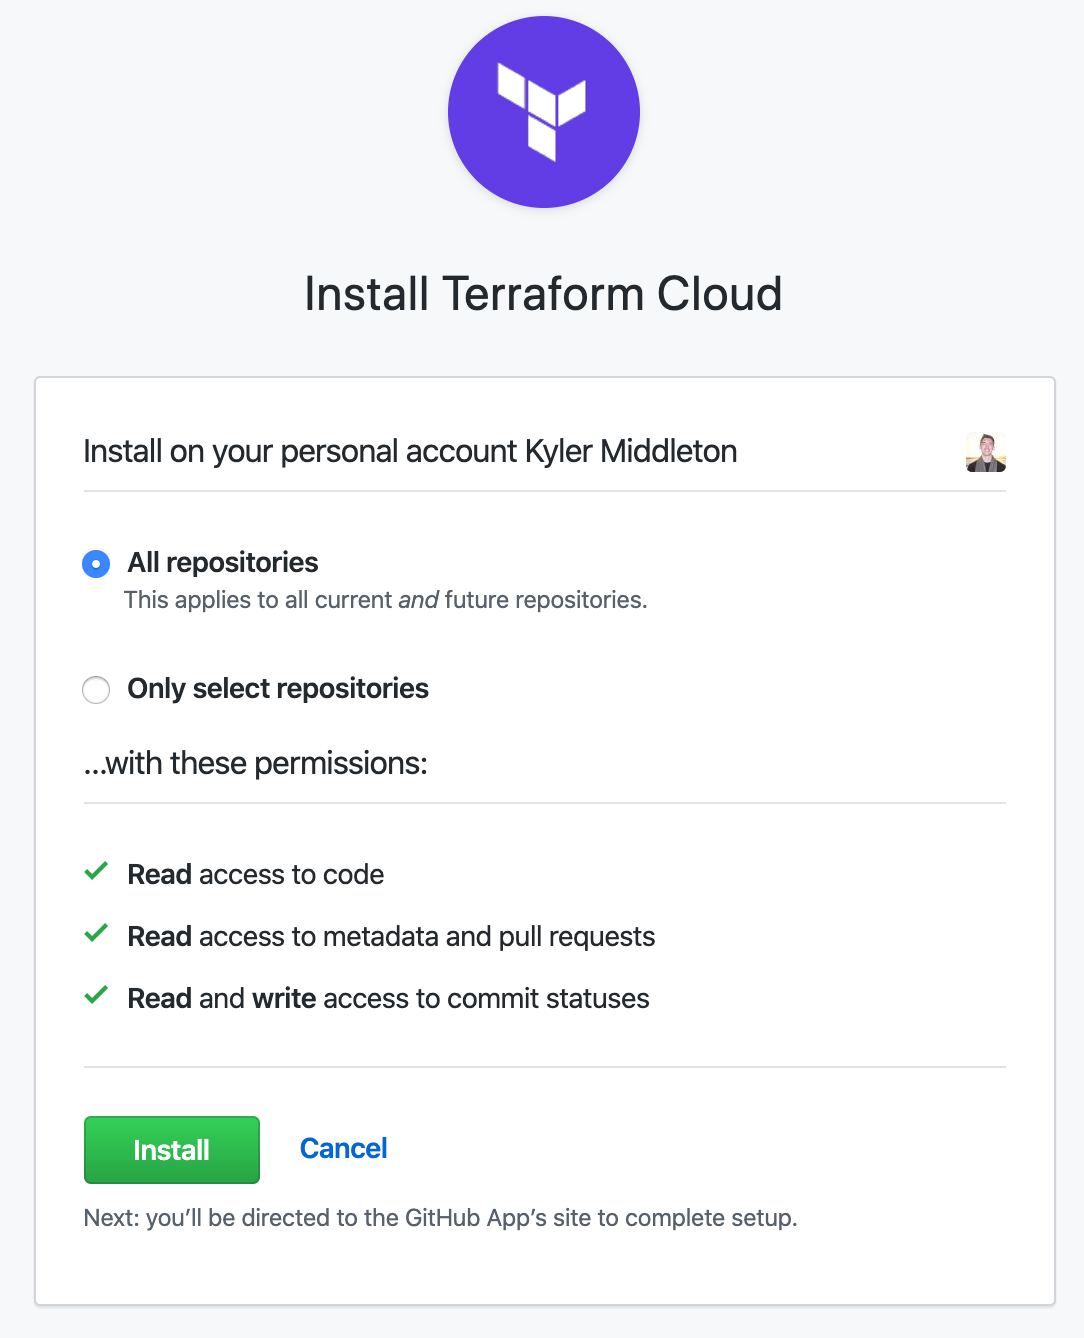
Next, GitHub will install a webhook to Terraform Cloud that is linked either to all repositories you have or only to specific ones you select. I’ll choose “All repositories” for simplicity in this demo, but feel free to limit it down to just the new repo you created with AWS terraform code.
Finally, step 1 is complete. Step 2 wants us to tell Terraform Cloud which repos to link to. It will show a list of your repositories. If you have a lot of them, there is a search bar under the selection area. Click the repo, and we continue on to step 3.
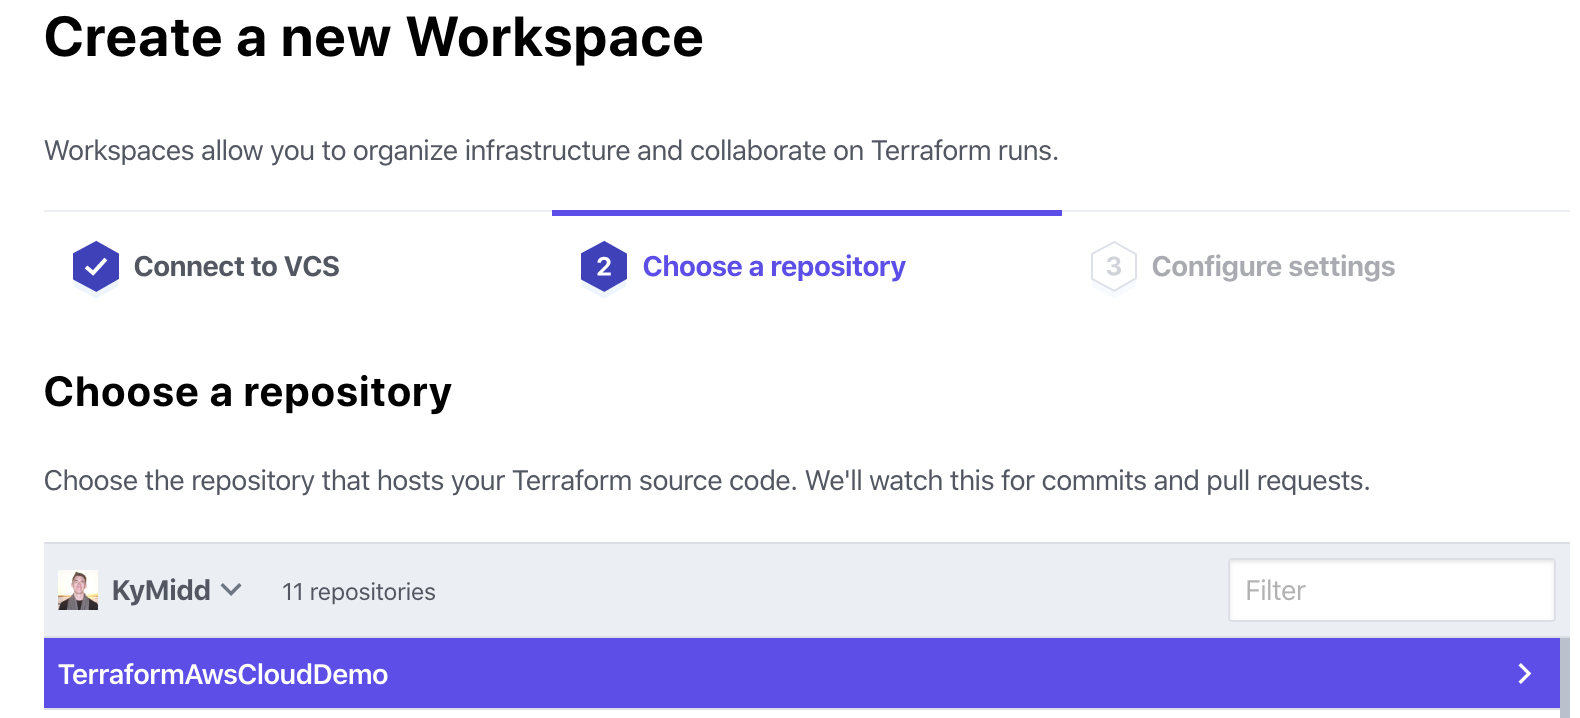
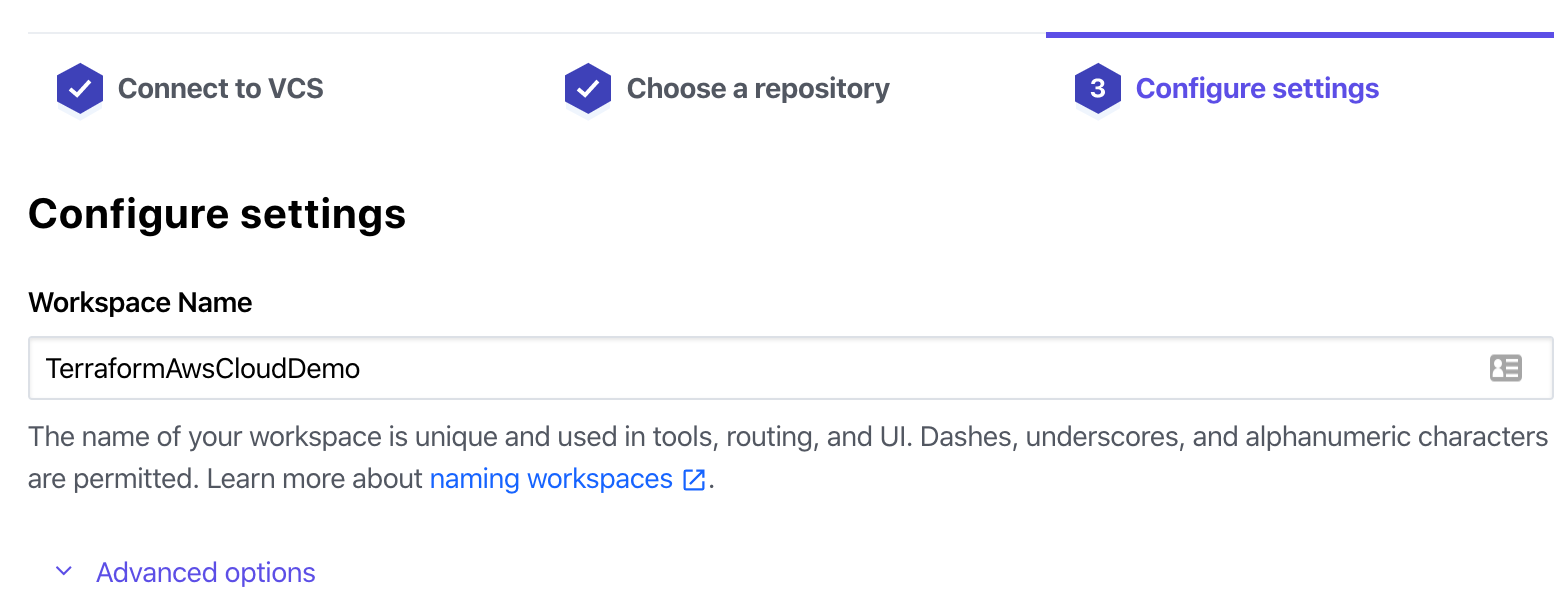
You can name the workspace, which is local just to within Terraform Cloud. It defaults to the same as the repository name, which I find helpful to keep everything aligned.
The advanced options permit watching a branch other than the default/master branch or triggering runs for specific files, rather than the default of any file. We’ll leave all the options at their defaults for the sake of this demo. Click “Create Workspace”.
The workspace will use the snazzy new GitHub permissions to reach out to the repo and synchronize the files. You should see the following success message after a minute or two. If you see any other message, read back on the blog here and make sure all permissions are assigned correctly.
Click on Configure variables.
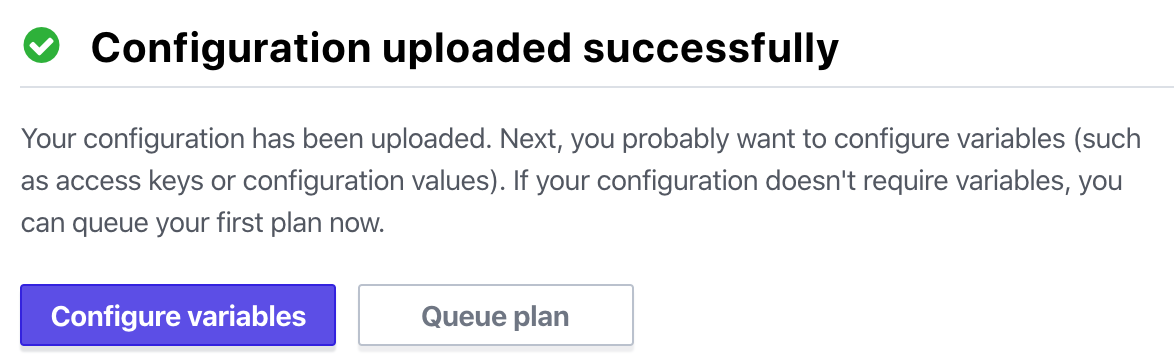
We need to build an IAM user in AWS to permit Terraform Cloud to reach into AWS and make changes. Let’s leave the Terraform Cloud page here on the variables page — we’ll be back in a minute.
AWS: Let’s Build an IAM User
Terraform uses variables for all sorts of things. There are the “Terraform variables” which are used within terraform, and used for setting names, controlling resources, etc.
There are also the “environmental” variables that are used for more external items like authenticating to a cloud provider, e.g. AWS.
There are lots of ways to link Terraform to AWS — HasiCorp maintains a page that shows the different methods. One of the most secure ways is to run your code from a local box within the AWS account, something I’ve discussed in a previous blog post. This method prevents static credential use, particularly for the high permissions Terraform needs to build and manage most/all resources.
However, Terraform Cloud doesn’t (yet) support external compute resources to execute Terraform code at the behest of TF Cloud, so we need an alternate method. We’ll use the easiest — building a static IAM user with administrative permissions in AWS, but note that there are others which are better security best practices.
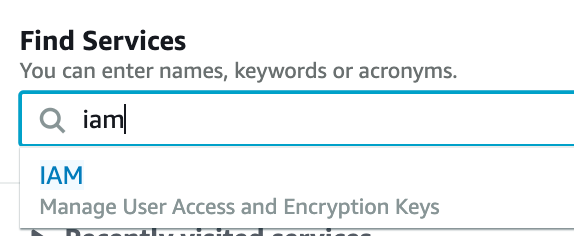
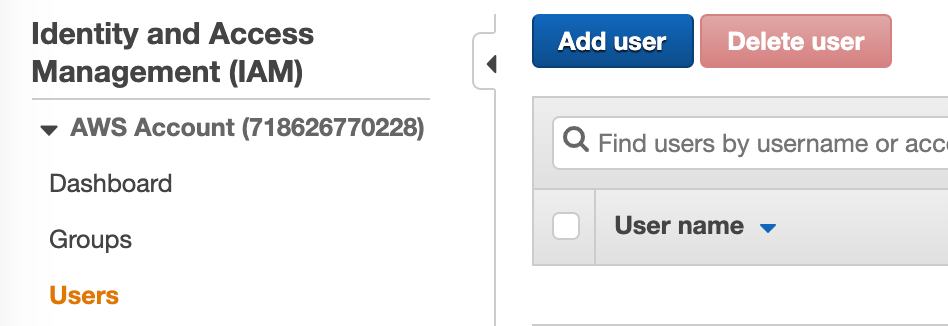
First, jump into AWS and type IAM into the main page console, then click on the IAM dropdown.
Click on “Users” in the left column, then click on “Add user” in the top left.
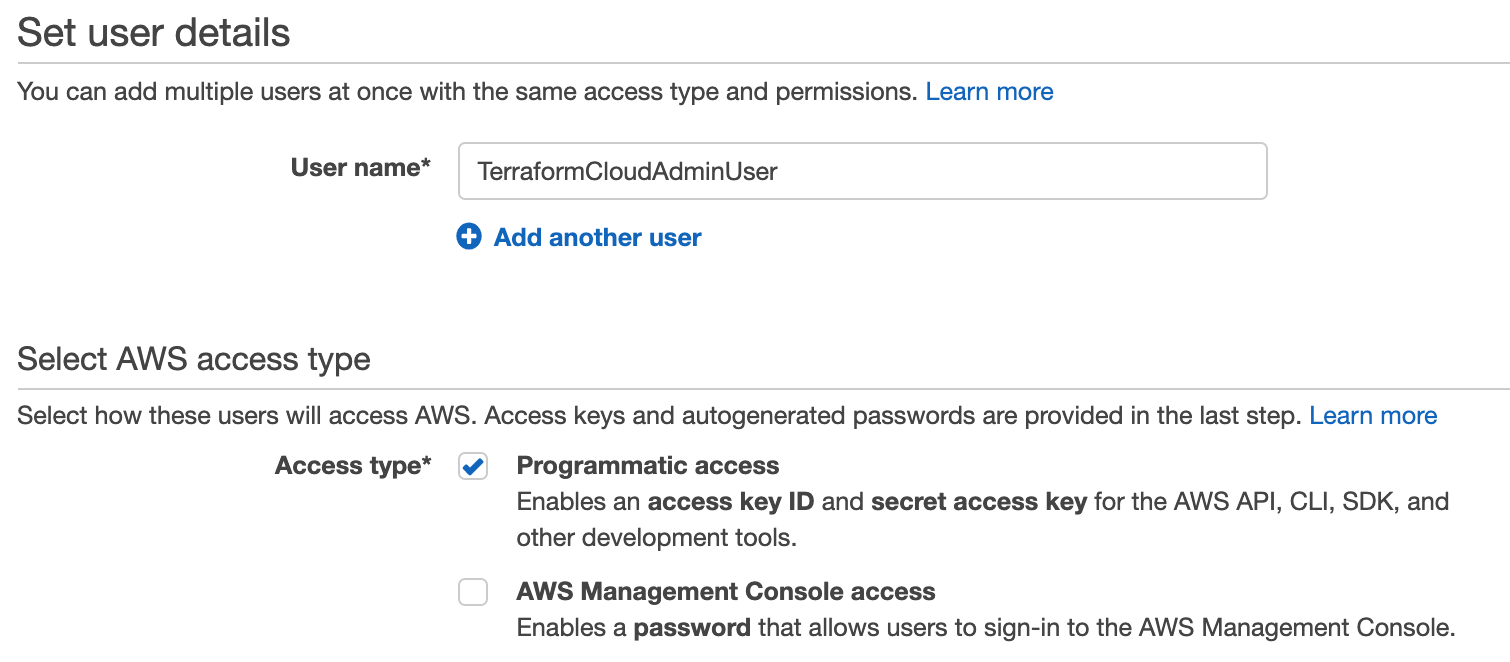
Name your user. It can be anything, but it’s helpful to have it named something you recognize as a service account used for this Terraform Cloud Service. Terraform can only do what the IAM user can do, and we’re going to make it a global administrator within this account, so I like to include “Admin” in the same so I remember not to share the access creds.
Also, check the “Programmatic access” checkbox to build an Access Key and Secret Access Key that we’ll use to link TF to AWS, then hit “Next: Permissions” in the far bottom right.
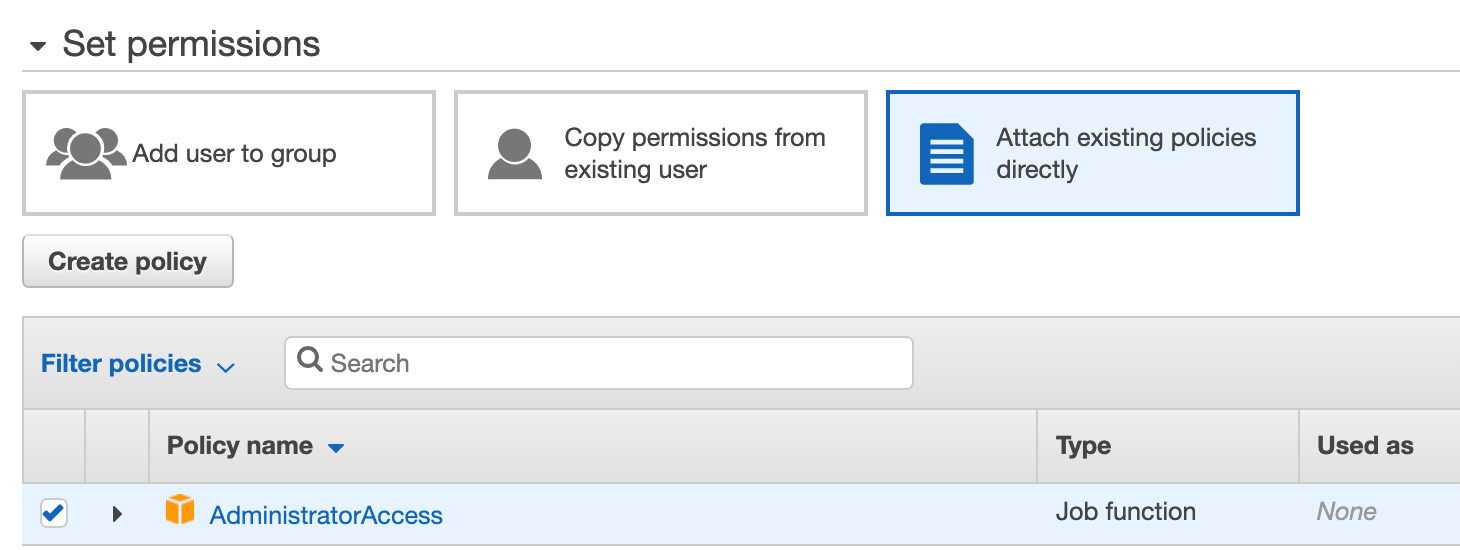
This user now exists, but can’t do anything. For a more in-depth look at IAM (and it does go deep), refer to the same earlier blog about assuming an IAM role. To grant it permissions, we can either create a custom policy with specific and limited permissions, or we can link to existing policies. For the sake of this demo, we’ll use “AdministratorAccess”, but remember this step as another opportunity for extra security in a real enterprise environment.
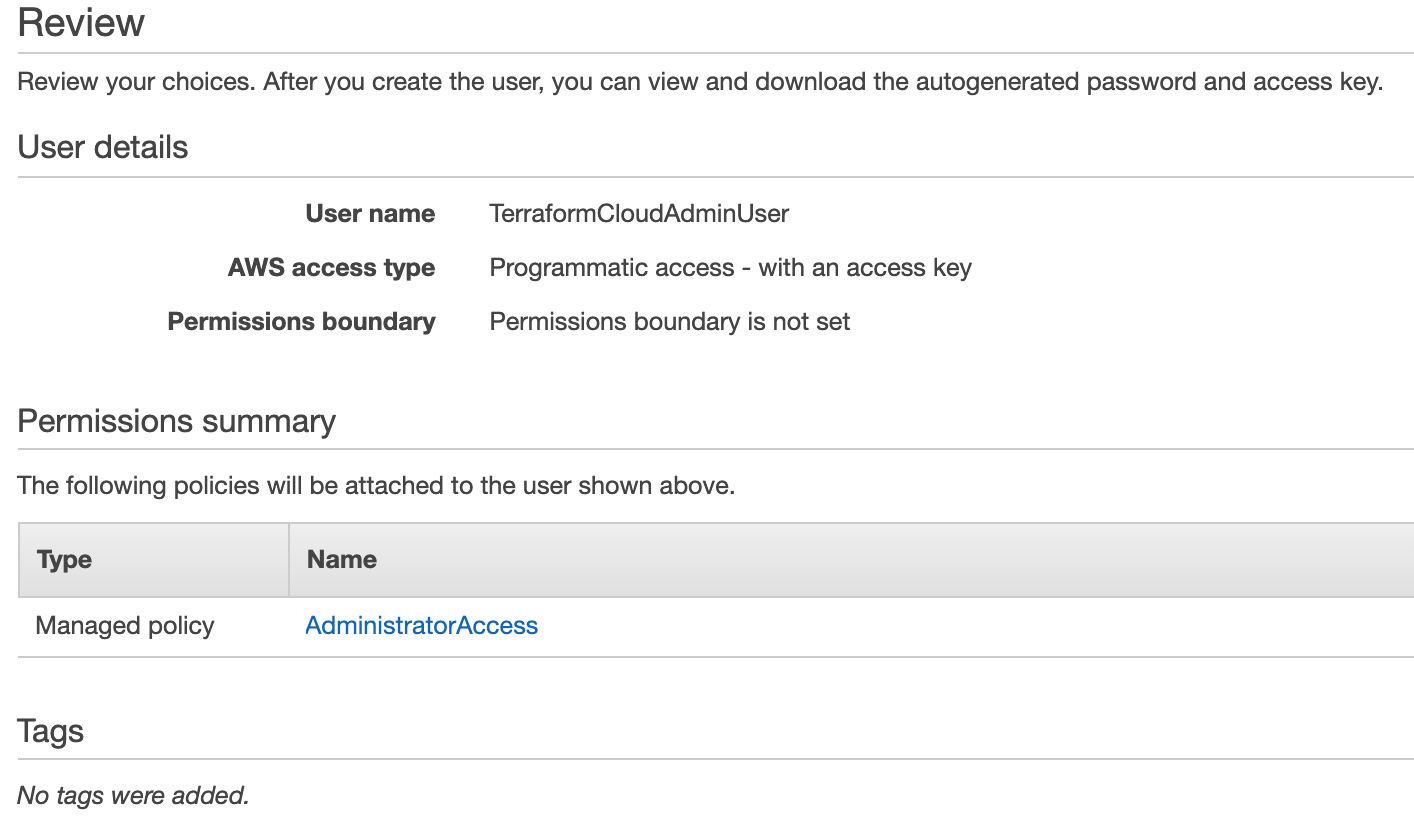
Hit Next Tags in the bottom right, then Next Review. If the Review page looks like the below, hit “Create user” in the bottom right, and we’re in business.
You’re presented with an Access Key ID and a secret access key (behind the “show” link). You’ll need both of these, so don’t close this page.

Terraform Cloud: Plug in AWS Env Variables
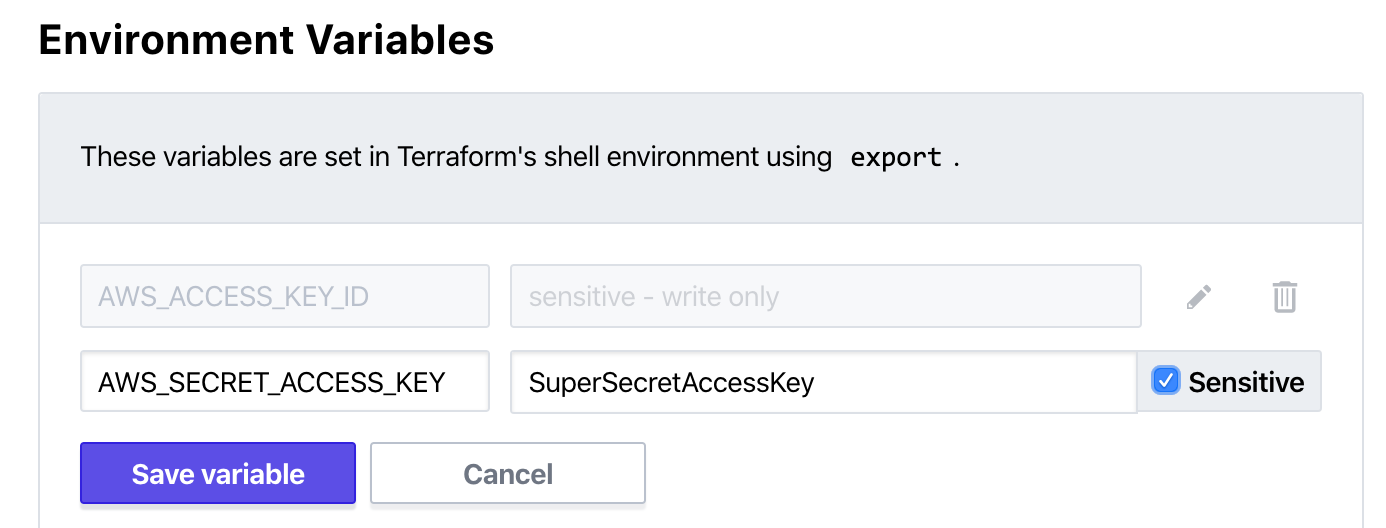
Terraform by default can read environmental variables of the access key ID and secret access key, and connect to AWS to do work. This is the easiest method to link the two up, so let’s do it. Back at the Terraform Cloud variables page, let’s build a few variables and populate their values at the IAM user values from AWS that we just created.
Terraform has a great write-up of what we’re doing on this page under “Environment variables”.
We only need two variables for this to work (since the region is asserted directly from the TF code provider block as us-east-1), so let’s build them.
Make sure to mark both of these are “Sensitive”. Remember, these values grant someone administrative access to your AWS account, and your credit card is linked to this account. For the sake of wallets and purses everywhere, protect these values!
Once done, hit “save variable” and the values will disappear, to be writable (but not readable) only. Perfect.
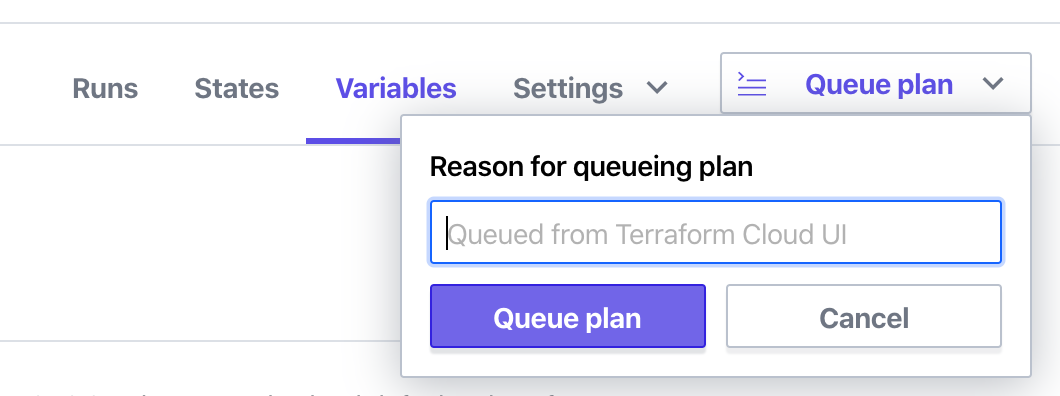
When you feel good about those two variables, scroll to the top and in the top right click on “Queue plan”. You can enter a reason if you’d like, and then click “Queue plan” again.
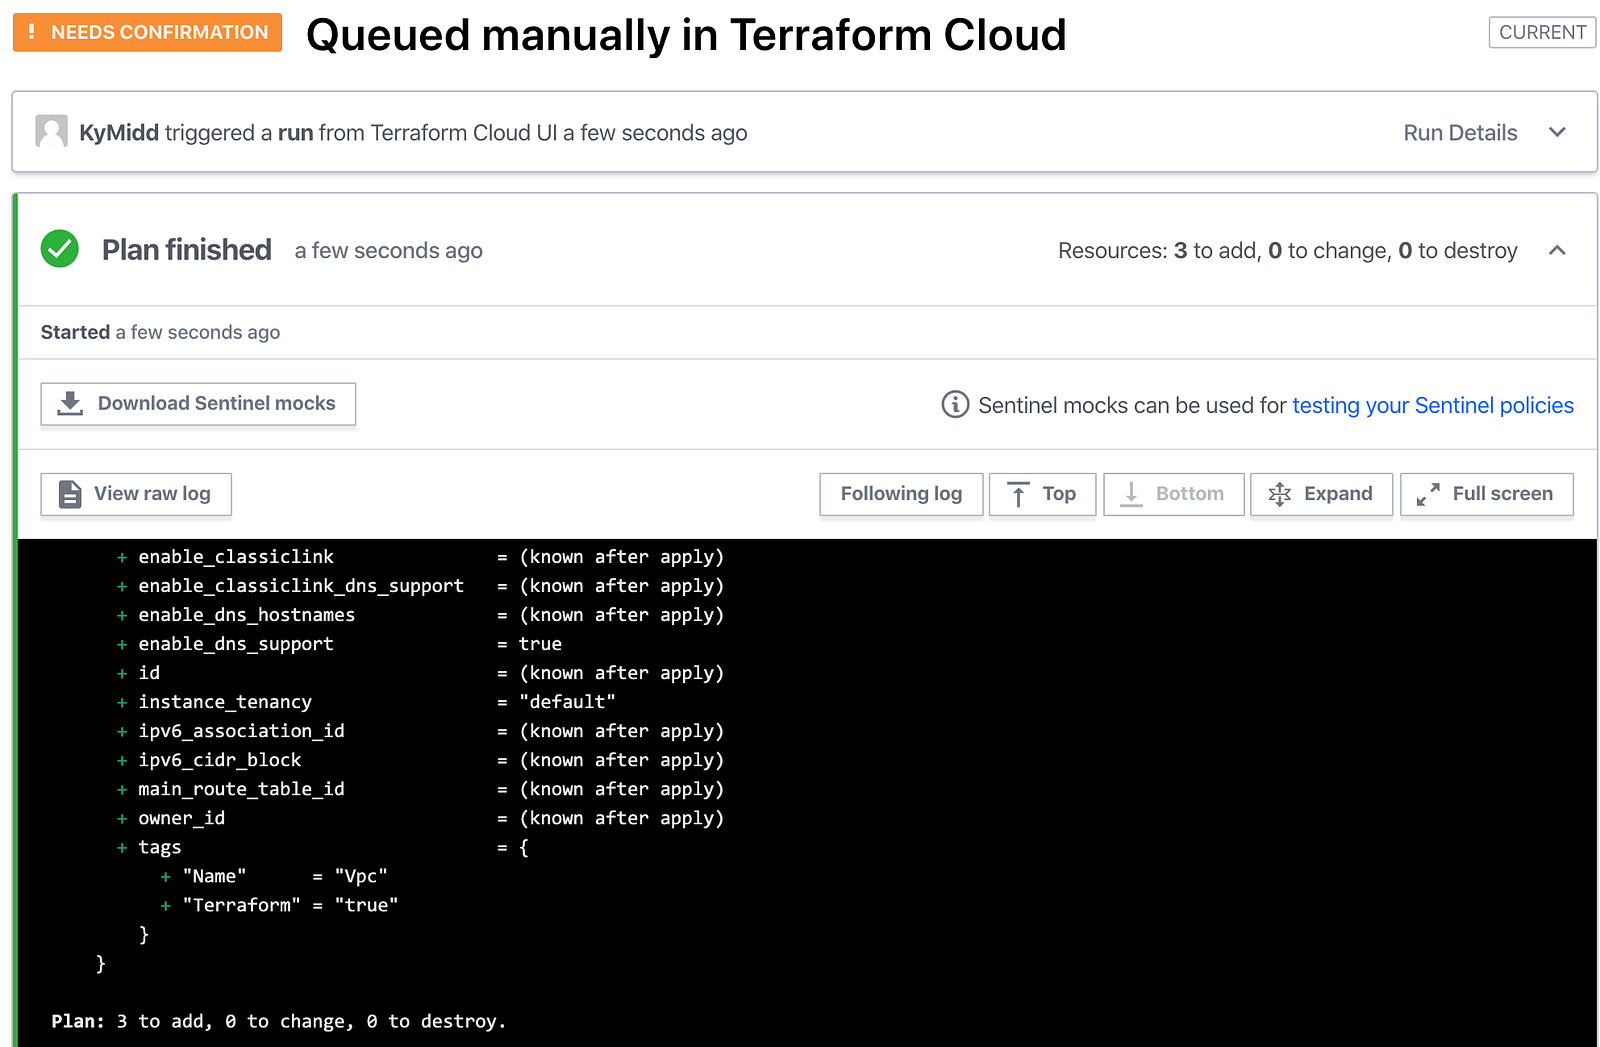
It shouldn’t take long at all before you see the results in your web browser. By default, the Terraform Cloud console will pause when a “terraform plan” has finished, and requires confirmation before building resources. It’ll look like the below. Feel free to scroll around in the plan to see what will be built or changed. Unless you modified the repo in your GitHub, it’ll look exactly like this.
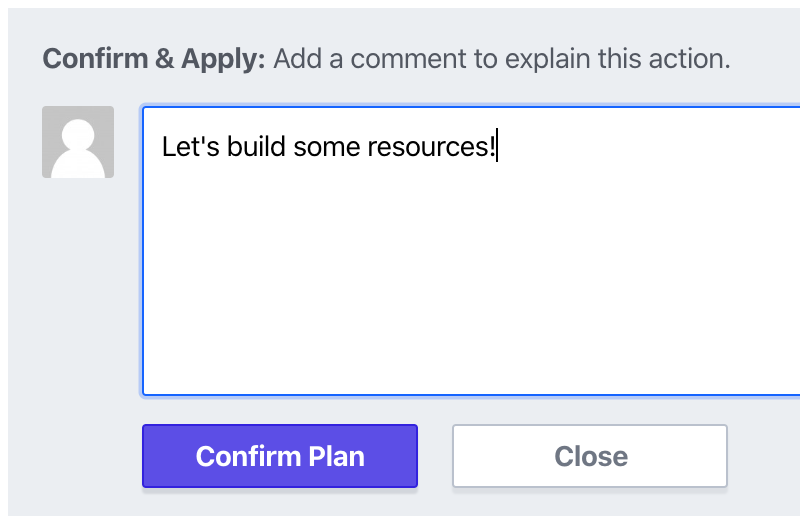
If you want to continue onto building the resources (let’s do it!), scroll to the bottom and click “Confirm & Apply”.

You have the option to enter a comment, and then click “Confirm Plan” to continue to an apply step.
Hopefully, after a few seconds, you’ll see the apply run, and the below photo will show a happy green checkbox that marks the apply went smoothly.
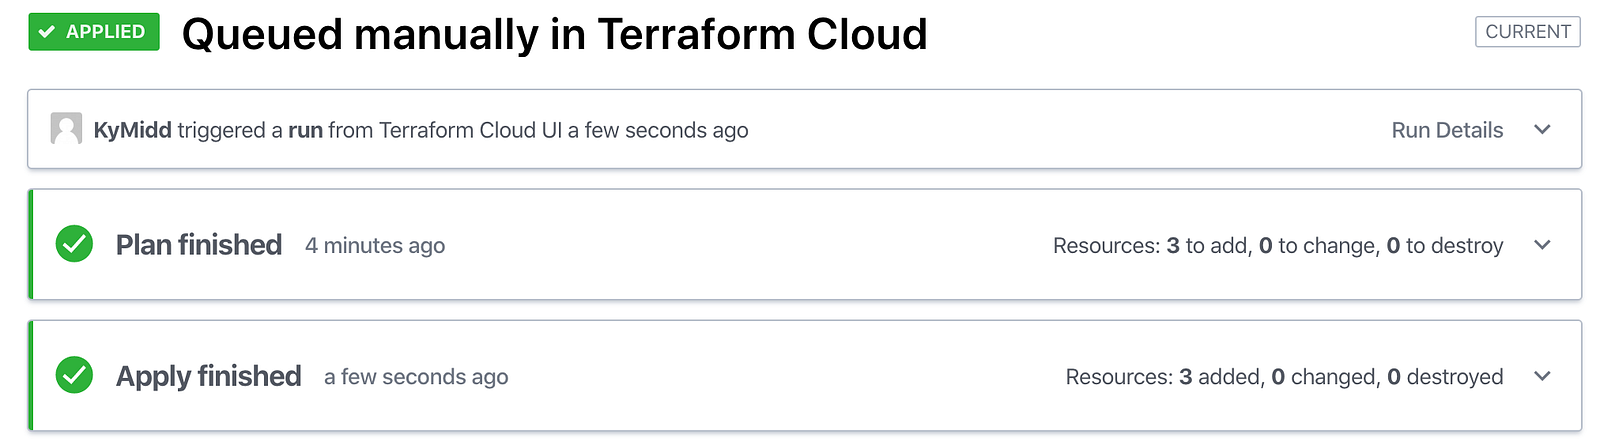
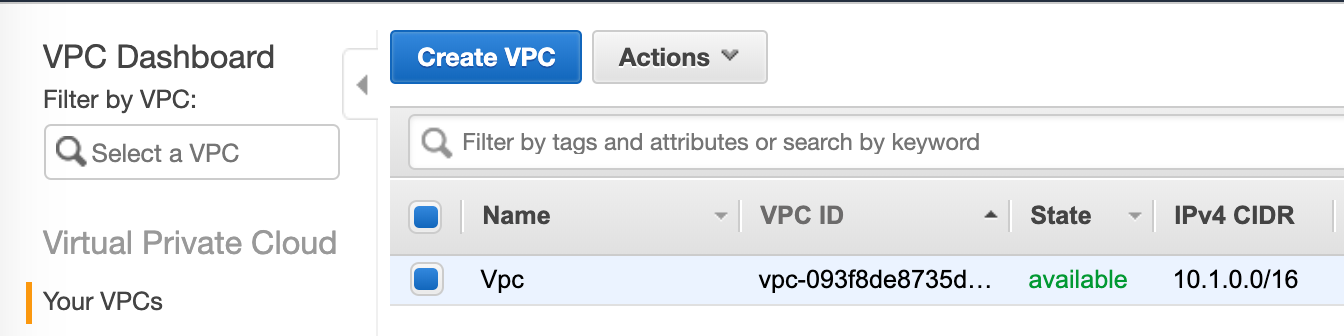
If you switch over to AWS, you should now see the new VPC under the “VPC” console that shows network resources.
We’re in a cool state now. Terraform Cloud is watching your VCS — GitHub, in this case, and when code is pushed or merged into the master git branch, it will automatically (!) execute a Terraform plan. All you have to do to build resources is log into Terraform Cloud, review the plan (optional, but highly, highly recommended), and click “Confirm and Apply”.
That’s the power of Terraform Cloud.
Now — Let’s Burn It All Down
Resources in AWS cost money, so before we close for the day let’s burn it all down. Terraform can run a “destroy” action that will destroy all managed resources, which is perfect for labs and testing. However, it’s not enabled on the pipelines by default — we need to add a variable to enable it. It’s a great safety measure, but one we need to bypass.
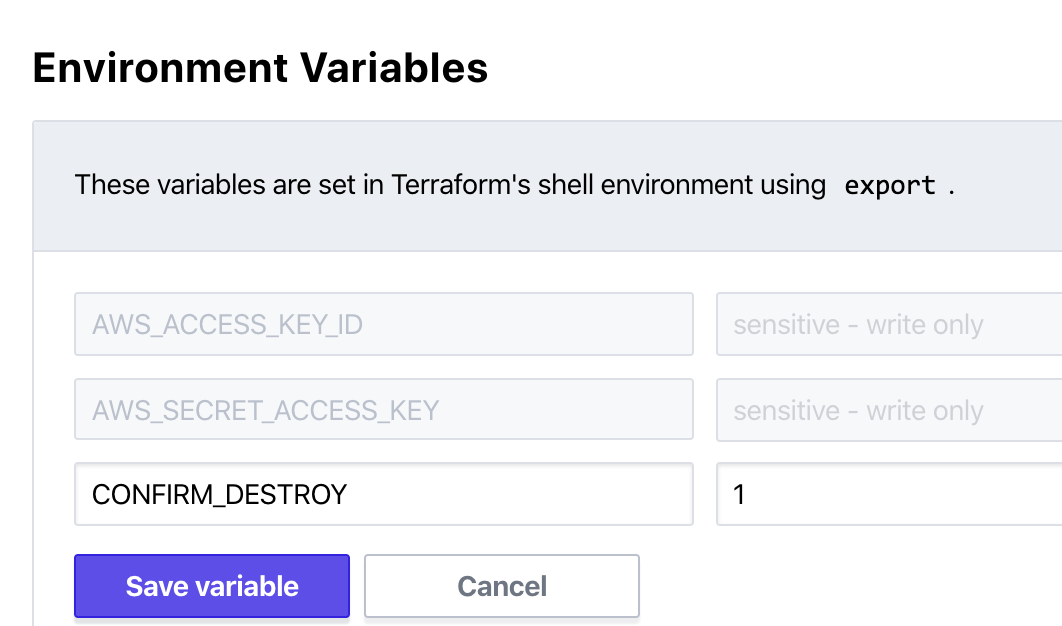
In your workspace, scroll to the top and click on “Variables”. Create a new Environmental Variable with the name of CONFIRM_DESTROY and a value of 1. The value doesn’t need to be sensitive.
Once that variable is created in the workspace (even if you haven’t run the workspace queue again), you can now run a “destroy” plan. Click on Settings in the top right and then on Destruction and Deletion.

Click the button in the bottom right. Keep in mind, this will DESTROY all the resources Terraform manages in this workspace — great for labs, not great for production.
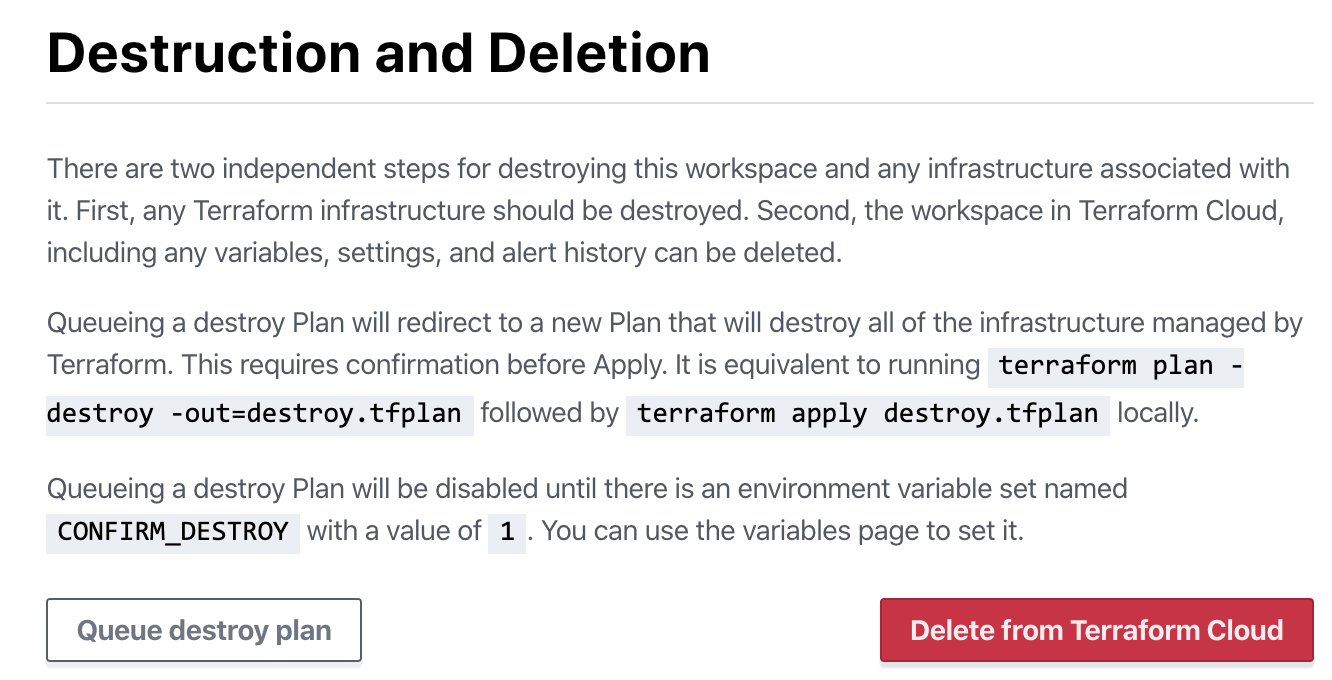
This runs as a normal pipeline, so you’ll still need to find the run and click “Confirm & Apply” to destroy all resources.

Summary
In this blog, we created a new organization in Terraform Cloud. We created a new GitHub repo with Terraform code for AWS, then linked TF Cloud to GitHub, and told it to watch the repo for any changes.
We created an IAM user in AWS with administrative rights, then programmed it into the TF Cloud workspace.
TF Cloud’s solution is somewhat inflexible compared to other CI/CD solutions, but it is infinitely more simple than the other ones I’ve deployed so far. Check out some of the others that I’ve deployed, and how they compare:
Thanks all. Good luck out there!
kyler
kyler
Companies Don't Exist Solely for Profit

Yesterday, a streamer for HearthStone, a game published by Blizzard, announced during a stream that they support the Hong Kong people as they protest against China’s crackdown on their protests. Blizzard moved quickly and decisively… to punish the streamer by revoking money the streamer had earned during the season, as well as breaking a contract with two hosts of a show the streamer was on, though they weren’t aware of the streamer’s intentions and quickly cut to commercial after the streamer spoke.
Here’s a CNET article breaking down the history and story.
This isn’t the first time we’ve seen an American company kowtow to a censor-happy foreign power. The examples of this abhorrent behavior from companies, unfortunately, are coming more and more frequently.
Earlier this summer Nike pulled from sale a model of shoes after the shoe’s designer publicized their pro-Hong Kong views.
South Park earlier this week appears to have intentionally incited the ire of China by criticizing China’s censorship-first policies in an episode named “Band In China.”
Google backed down from building a censored search engine targeted at Chinese and other pro-censorship countries only after massive employee protests roiled over into public dissent in the media. Less publicized are other companies that quietly supplicate themselves to China’s policies (ahem, Microsoft) by filtering their searches to hide results unfavorable to the ruling powers in China.
It Hasn’t Always Been This Way
Though it seems like it sometimes, companies haven’t always put profit first, or chased profits at the expense of all else. In fact, it’s a relatively recent trend — one in the last 50 years.
In 1970, Milton Friedman, a popular and influential economist, made an argument that companies had no duty to serve their employees, or benefit the world they exist in. Their duty was solely to maximize their profit, and minimize their costs, in order to generate the most value.
The name of this paper, “The Social Responsibility of Business is to Increase its Profits” made it clear that Friedman knew that this view would prove volatile, and potentially repugnant to those who felt the increased wealth, stability, and resources of large and profitable companies was to use their attributes as a force for good.
This view wasn’t immediately adopted. Many large companies continued spending some of their dollars to improve the world, or provide employees with more than the acceptable level of benefits, or pay. Shareholders in these companies rewarded those companies that behaved in this way.
However, this view gained traction, and in 1997 a group of influential CEOs calling themselves the “Business Roundtable” announced that the “principal objective of a business enterprise is to generate economic returns to its owners.”
Soon, this philosophy trickled down to companies around the world, as they pushed down labor costs, revoked or reduced benefits, and started to actively band together in washington to lobby lawmakers to also adopt this view, and begin to see companies in a simpler way — one which utilizes their resources to make money at the smallest expense possible.
What Can I Do?
It’s the responsibility of all of us to stand up to companies that behave in this way. We don’t have lobbyists in washington, but we can vote with our dollars. Stop spending money on companies and countries that behave in ways that are unethical.
There is now a strong push for companies to operate in an ethical way, and consumers are starting to take notice. Companies like Ethical Consumer have sprung up to help consumers find products and companies that behave in a more ethical way.
Also, companies are comprised of employees. Seek our companies that treat their employees well and abandon companies that don’t. That’s clearly harder than it seems — we all have to pay our rent and eat. But look for exits from companies which come to light and are doing unethical things.
Techies in particular don’t recognize their power. Technical folks are an incredibly powerful force for change — look at the protests at Google that led to real change at the company.

These folks are also the most vulnerable — they rarely recognize the tangible consequences to their actions — an often repeated example is how IBM built a tracking computer system for the Nazis that was used to catalog and manage the Jewish prisoner populations as they were shuttled and kept at concentration camps.
Recognize your power. Speak up. Show your values with your dollars and your votes. Together we can do something.
Subscribe to:
Posts (Atom)